This chapter lists the DVBViewer GE features that - compared to earlier DVBViewer versions or DVBViewer Pro 3.0 – are different or new. Please refer to the DVBViewer Pro Manual for more information.
Recording | Recorder Control | Scheduler Window | Scheduled Recordings | Disable / Rebuild Playback | Using the DVBViewer Filter for MPG/TS Playback | DVD Playback | Screenshots | Channellist Window | Channel Auto-Update | Zoom Settings | Command Line Parameters | Miscellaneous Changes | Configuration in Setup.ini
Recording with DVBViewer GE works independently from playback. It doesn't require an active DirectShow filter graph (except for the Audiorecorder Plugin). Several functions that inevitably stopped recording in former DVBViewer versions can now be used trouble-free during an ongoing recording. They are enumerated in the General Instructions.
The following events still interrupt a recording:
![]() Putting the DVBViewer GE into its standby mode with the command line
parameter -c that switches the tuner off. The recording is stopped
without any warning. Use „View/ Disable Playback“,
if you want the recording to continue.
Putting the DVBViewer GE into its standby mode with the command line
parameter -c that switches the tuner off. The recording is stopped
without any warning. Use „View/ Disable Playback“,
if you want the recording to continue.
![]() Switching over to a channel that is broadcasted on a different
transponder (resp. frequency) than the one that is currently
recorded.
Switching over to a channel that is broadcasted on a different
transponder (resp. frequency) than the one that is currently
recorded.
![]() Scanning in the Channellist Window.
Scanning in the Channellist Window.
![]() Closing DVBViewer GE.
Closing DVBViewer GE.
In the latter three cases DVBViewer GE displays a warning that allows to cancel the action - except for automatically triggered close or shutdown actions (e.g. by a timer), or when you are using a remote control.
Filename scheme: DVBViewer GE allows to preset a filename scheme und „Settings/ Options/ Recorder“. It provides four variables (%e, %s, %d, %t) as placeholders for the event (resp. title), the station, date and time. Everything else is inserted unchanged. E.g. the filename scheme %s_%e 2005-%d adds 2005 to the date and yields to something like „BBC World_BBC News 2005-04-29“.
You may delete a recorded file by
pressing the Alt and Shift key simultaneously while stopping a
recording manually.
Timeshift still requires active
playback of the corresponding channel. „View/ Disable
Playback“ or changing the channel stops an ongoing
timeshift recording. If you want to get a warning, tick the according
checkbox under „Settings/ Options/ Recorder“. The
Play Button in the Recorder Control Window provides an alternative
way of „timeshifting“ without these restrictions.
The Audiorecorder Plugin also requires playback of what it is recording, since it gets the data from the audio decoder.
contents | to the top | preceding chapter
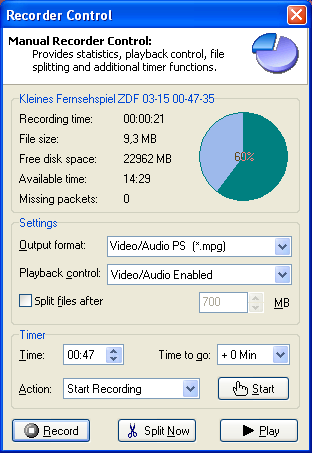
The Recorder Control Window, that appears after
clicking
![]() ,
has been re-designed completely:
,
has been re-designed completely:
![]()
 The
upper part shows the statistics of the current recording. The
pie chart reflects the occupied resp. free disk space. The remaining
recording time is an estimated value, based on the current bitrate.
The
upper part shows the statistics of the current recording. The
pie chart reflects the occupied resp. free disk space. The remaining
recording time is an estimated value, based on the current bitrate.
![]() The file format dropdown list additionally contains the
transport stream formats „Video/Audio TS“ and
„Video/Audio/Teletext TS“, for recording movies
with teletext subtitles. The PVA format has been dropped, but is
still provided by the Videorecorder Plugin.
The file format dropdown list additionally contains the
transport stream formats „Video/Audio TS“ and
„Video/Audio/Teletext TS“, for recording movies
with teletext subtitles. The PVA format has been dropped, but is
still provided by the Videorecorder Plugin.
![]() The timer in the lower part performs different actions after
a given time. Proceed as follows:
The timer in the lower part performs different actions after
a given time. Proceed as follows:
Enter the time at which the action shall be performed in the Time Field. Alternatively use the „Minutes To Go“ Dropdown List to select a number of minutes "from now", after which the action shall be performed (sleeptimer function).
Select the action that shall be performed in the Action dropdown list.
Finally click the 'Start' button. After that, the „Minutes To Go“ field counts down the remaining time.
The Recorder Control Window automatically pops up 30 seconds before a timer action is executed, if the according checkbox under „Settings/ Options/ Recorder“ is ticked.
Please note: When a scheduled
recording is executed, DVBViewer GE uses this timer to set up the end
time and the associated action, as it has been programmed in the
Scheduler Window, thus overriding any previous timer setup.
This enables to easily change the setup of a scheduled recording while it is executed. E.g. if a broadcast takes longer than expected, you may stop the timer, set a new end time, and start it again. Or if a recording has been scheduled with „Shutdown After Recording“, you may change it to „Stop Recording“, in case you want to spend some more time with your PC. DVBViewer GE deactivates the timer automatically if you stop a scheduled recording manually.
![]() „Play“ starts playback of the current (or
last) recording. DVBViewer GE enables the button 10 seconds after a
recording has been started (MPG and TS format only).
„Play“ starts playback of the current (or
last) recording. DVBViewer GE enables the button 10 seconds after a
recording has been started (MPG and TS format only).
This function may be used as a timeshift alternative. The Play Button enables delayed TV with „normal“ recordings – even with teletext subtitles, if „Video/Audio/Teletext TS“ has been selected as file format: After having started playback, go to the DVBViewer GE main window, press F12 to activate the OSD teletext, and enter the subtitle page number.
„Channel/ Previous Channel“ can be used to toggle between the live TV transmission and playback of the recorded file.
contents | to the top | preceding chapter
The Scheduler Window (formerly Recorder Settings) contains some enhancements concerning autmatically repeated recordings.

In contrast to former DVBViewer versions
(up to 2.3 beta) new or changed entries take effect immediately after
clicking „Add“ or „Update“,
without having to close the window first. The same applies to
recordings that are scheduled via the EPG window with „Send
to PVR. If the start time is already reached or exceeded, the
recording starts at once.
When scheduling a recording, DVBViewer GE automatically ticks the according day of week and displays it in red. The checkmark belonging to the next recording date, which is always displayed in red, can not be removed, except by changing the date. All additionally ticked recording days, which are displayed in black, indicate auto-repeat recordings that are executed subsequently.
The Scheduler Window provides the following possibilities:
![]() Auto repeat recording at subsequent days of week: Simply tick
the desired days. DVBViewer GE removes the checkmark, when it
executes a scheduled recording, and – if more days are ticked
– sets the date to the next day. If no more checkmarks are
left, the entry is deleted.
Auto repeat recording at subsequent days of week: Simply tick
the desired days. DVBViewer GE removes the checkmark, when it
executes a scheduled recording, and – if more days are ticked
– sets the date to the next day. If no more checkmarks are
left, the entry is deleted.
![]() Weekly auto repeat: Tick the
Weekly auto repeat: Tick the
![]() checkbox to let the DVBViewer GE repeat the sequence of ticked days
weekly. In this case the day-of-week-checkmarks are not
removed when a scheduled recording is executed.
checkbox to let the DVBViewer GE repeat the sequence of ticked days
weekly. In this case the day-of-week-checkmarks are not
removed when a scheduled recording is executed.
![]() Auto repeat deactivation: Untick the checkbox of the
according entry in the list of scheduled recordings. Deactivated
recordings are not executed, but remain in the list, so that they
can be re-activated later (useful if a TV series is not broadcasted
on a certain day). However, DVBViewer GE deletes the entry after the
last recording date has passed. (thus never, if the
Auto repeat deactivation: Untick the checkbox of the
according entry in the list of scheduled recordings. Deactivated
recordings are not executed, but remain in the list, so that they
can be re-activated later (useful if a TV series is not broadcasted
on a certain day). However, DVBViewer GE deletes the entry after the
last recording date has passed. (thus never, if the
![]() checkbox is ticked).
checkbox is ticked).
Please note: Ticking a recording
day in DVBViewer Pro 3.0 implies weekly auto repeat. In DVBViewer GE
it does not. The
![]() checkbox has to be ticked additionally, which is a bit more flexible,
since it allows auto repeat for a limited number of days.
checkbox has to be ticked additionally, which is a bit more flexible,
since it allows auto repeat for a limited number of days.
Click the
![]() symbol to store the current setting of the neighbouring dropdown
lists as default (action after recording and execution mode). The
DVBViewer GE automatically assignes the default settings to
recordings that are scheduled in the EPG window via „Send to
PVR“.
symbol to store the current setting of the neighbouring dropdown
lists as default (action after recording and execution mode). The
DVBViewer GE automatically assignes the default settings to
recordings that are scheduled in the EPG window via „Send to
PVR“.
![]() Auto
repeat recordings are marked by a '+' sign in the date column;
recordings that are finished with „Shutdown“,
„Standby“ or „Hibernate“ by a
'*' sign in the end column.
Auto
repeat recordings are marked by a '+' sign in the date column;
recordings that are finished with „Shutdown“,
„Standby“ or „Hibernate“ by a
'*' sign in the end column.
contents | to the top | preceding chapter
In DVBViewer GE scheduled recordings may start in the background, without playback of the corresponding channel, particularly
![]() if playback is switched off („View/ Disable Playback“).
if playback is switched off („View/ Disable Playback“).
![]() If DVBViewer GE plays a file or a DVD
If DVBViewer GE plays a file or a DVD
![]() if you watch a different channel on the same transponder
(frequency).
if you watch a different channel on the same transponder
(frequency).
In all these cases recording does not affect playback, except a short indication in the OSD (On Screen Display).
If recording requires tuning a different frequency, DVBViewer GE switches over to the corresponding channel, however.
If a scheduled recording is due to be
started, but DVBViewer GE is already busy with recording a channel of
the same transponder, it automatically delegates the task to the
Videorecorder Plugin (if installed). If the plugin is busy too, it
tries to delegate the task to another Videorecorder Plugin instance.
In contrast to former DVBViewer versions it is not necessary to
specify the channel the plugin shall record.
If a scheduled recording can not be executed it is placed back and started at the next opportunity – e.g. if all available recorder instances are already busy, or if the channel for which the recording has been scheduled requires tuning a different frequency, which would interrupt an already ongoing recording.
contents | to the top | preceding chapter
The „View/ Disable Playback“ command deactivates playback completely by removing the DirectShow filter graph, thus lowering memory consumption and processor usage drastically. Since DVBViewer GE still receives data from the TechniSat card, (scheduled) recordings can start or continue, though. Plugins that access the data stream also remain functioning. This way of disabling playback is much more effective than the according function in the Recorder Control Window, that only cuts off the data flow in the filter graph without removing it.
The counterpart „View/ Rebuild Playback“ re-activates playback. It also works – in contrast to former DVBViewer versions – with file playback. Aonther consequence: You may change the decoder or renderer (see „Settings/ Options/ DirectShow“) while playing a file: Playback is shortly interrupted and then continued.
Please note the difference between „View/
Disable Playback“ and the command line parameter -c that
puts DVBViewer GE into its standby mode. -c deactivates playback and
the data stream from the TechniSat card, thus stopping a recording in
any case.
The DVBViewer standby mode may also occur as closing action of a scheduled recording. It does not prevent the execution of scheduled recordings, however, since the data stream is re-activated automatically when a recording starts
When using the DVB Task Scheduler with the option „Restart DVBViewer Without Tuning Last Channel“ DVBViewer GE is launched in its standby mode. In contrast to other DVBViewer Versions the subsequent start of a scheduled recording does not activate playback. It has to be done manually by performing „View/ Rebuild Playback“ or selecting a channel – peferably the one that is recorded, or at least a channel from the same transponder, of course.
contents | to the top | preceding chapter
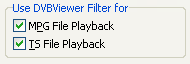 „Settings/
Options/ DirectShow/ Use DVBViewer Filter for“ allows to
choose wether the DVBViewer Filter is used for MPG/TS file
playback. It replaces the following components:
„Settings/
Options/ DirectShow/ Use DVBViewer Filter for“ allows to
choose wether the DVBViewer Filter is used for MPG/TS file
playback. It replaces the following components:
![]() Microsoft file source filter
Microsoft file source filter
![]() Microsoft- or Elecard demultiplexer (if installed).
Microsoft- or Elecard demultiplexer (if installed).
The DVBViewer filter is selected by default, since it has several advantages:
![]() Playback of MPG/TS files while they are recorded. The play function
in the Recorder Control Windows uses this feature.
Playback of MPG/TS files while they are recorded. The play function
in the Recorder Control Windows uses this feature.
![]() Playback of teletext subtitles that are included in a TS file.
DVBViewer GE handles teletext data from a file in the same way as
data from a live stream. All teletext functions are available as
normal.
Playback of teletext subtitles that are included in a TS file.
DVBViewer GE handles teletext data from a file in the same way as
data from a live stream. All teletext functions are available as
normal.
![]() Correct aspect ratio display, if it changes within a file.
Correct aspect ratio display, if it changes within a file.
After deselecting the DVBViewer Filter for MPG/TS playback, it will still be used when you try to play an ongoing DVBViewer GE recording, since the Microsoft Filesource filter can not cope with it.
If a TS file, that has been recorded with
the Videorecorder Plugin, contains more than one channel, DVBViewer
GE plays the first channel that it can find in the file. If you need
switching to other channel(s), use the TSPlayer, that is part of the
Videorecprder Plugin packet.
contents | to the top | preceding chapter
The completely renovated DVD playback functions are accesible via the control bar. Insert a DVD and select „DVB Viewer/ DVD Playback“. After that, the following controls are available:
![]() Starts playback after pause or switches back to normal playback
speed.
Starts playback after pause or switches back to normal playback
speed.
![]() Pauses or continues playback.
Pauses or continues playback.
![]() Stop, back to the DVD main menu.
Stop, back to the DVD main menu.
![]()
![]() Forward / back to the next / preceding chapter.
Forward / back to the next / preceding chapter.
![]()
![]() Fast rewind / forward. Clicking these buttons repeatedly increases
the playback speed up to 8 times. Clicking the opposite function
decreases the speed stepwise. The current speed is displayed in the
OSD (On Screen Display).
Fast rewind / forward. Clicking these buttons repeatedly increases
the playback speed up to 8 times. Clicking the opposite function
decreases the speed stepwise. The current speed is displayed in the
OSD (On Screen Display).
![]() Displays the DVD title menu.
Displays the DVD title menu.
Resume DVD playback: When you stop DVD playback, e.g. by switching to TV or closing DVBViewer GE, the current playback position is stored. You may resume playback later by selecting „DVB Viewer/ Previous File“ or, in case you have played another file in the meantime, by clicking „DVB Viewer/ DVD Playback“ a second time. DVBViewer GE only remembers the playback position of the last played DVD.
contents | to the top | preceding chapter
Click
![]() in the toolbar to save the current TV / video image with its original
resolution as a BMP file in the folder, that has been assigned to
recordings under „Settings/ Options/ Recorder“.
The filename consists of the channel name, the titel of the broadcast
and the date and time.
in the toolbar to save the current TV / video image with its original
resolution as a BMP file in the folder, that has been assigned to
recordings under „Settings/ Options/ Recorder“.
The filename consists of the channel name, the titel of the broadcast
and the date and time.
Screenshots are available under the following conditions:
![]() Windows XP: „Unchanged“ or „VMR 7“ is
selected as video renderer under „Settings/ Options/
DirectShow“.
Windows XP: „Unchanged“ or „VMR 7“ is
selected as video renderer under „Settings/ Options/
DirectShow“.
![]() All Windows versions (including XP): DirectX 9 is installed and „VMR
9“ is selected as video renderer.
All Windows versions (including XP): DirectX 9 is installed and „VMR
9“ is selected as video renderer.
contents | to the top | preceding chapter
The DVBViewer GE Channellist Window contains a toolbar that provides the following function (from left to right):
![]()
![]() Import: Opens a dialog window for selecting a channellist
file. The content is added to the DVBViewer GE channellist, in
general as a new root folder. Alternatively you may simply drag the
file into the channelist window and drop it there. DVBViewer GE
supports importing the INI format. Additional formats are available
via import plugins. A plugin for CSV import is included (thanks to
Lars_MQ).
Import: Opens a dialog window for selecting a channellist
file. The content is added to the DVBViewer GE channellist, in
general as a new root folder. Alternatively you may simply drag the
file into the channelist window and drop it there. DVBViewer GE
supports importing the INI format. Additional formats are available
via import plugins. A plugin for CSV import is included (thanks to
Lars_MQ).
![]() Export: Opens a dialog window for saving the selected channel
or folder (including its content) as an INI or CSV file. Both are
text formats, the latter is suitable for importing it in Excel or
database applications.
Export: Opens a dialog window for saving the selected channel
or folder (including its content) as an INI or CSV file. Both are
text formats, the latter is suitable for importing it in Excel or
database applications.
![]() Reload / Undo: Reloads the channellist from the file
channels.dat, thus cancelling all previous changes.
Reload / Undo: Reloads the channellist from the file
channels.dat, thus cancelling all previous changes.
![]() Save: Writes the channellist to the file channels.dat (done
automatically when DVBViewer closes).
Save: Writes the channellist to the file channels.dat (done
automatically when DVBViewer closes).
![]() Delete: Removes the selected channel resp. folder from the
list. If a folder contains channels you are prompted to confirm the
action.
Delete: Removes the selected channel resp. folder from the
list. If a folder contains channels you are prompted to confirm the
action.
![]() Clear: Deletes the whole channellist (e.g. if you want to
rebuild it by scanning).
Clear: Deletes the whole channellist (e.g. if you want to
rebuild it by scanning).
![]() One-Click-Mode on/off: The One-Click-Mode (button displayed
in pressed-down state) allows changing channels with one mouse
click, instead of double-clicking them. However, renaming channels
with two slow clicks or sorting them by drag & drop is not
available in this mode.
One-Click-Mode on/off: The One-Click-Mode (button displayed
in pressed-down state) allows changing channels with one mouse
click, instead of double-clicking them. However, renaming channels
with two slow clicks or sorting them by drag & drop is not
available in this mode.
![]() OK: Closes the channellist window.
OK: Closes the channellist window.
contents | to the top | preceding chapter
If „Channel Auto-Update“ in the Channel Menu is switched on, DVBViewer GE scans the current channel in the background and automatically updates wrong channel data (especially the PIDS, Packet Identifiers), provided that basic values like frequency, polarisation or Service ID are still valid.
If DVBViewer GE detects differing channel data, it adjusts the according entries in the Channellist Window and re-tunes the channel.
Channel Auto-Update replaces the Dynamic
Tuner Plugin. It should no longer be used with DVBViewer GE and
DVBViewer Pro 3.0!
The automatic update is useful in case of channels that change their PIDs „on the fly“ (like some German regional channels), which requires a dynamical adaptation by the receiver. For a test you may try the German Test-R channel on Astra 19° East 11837 H. Every minute it toggles between two streams that belong to different channels.
A channel update during an ongoing recording stops the recording and immediately restarts it, if it is affected by the change. This does not apply to recordings that are executed in the background or by the Videorecorder Plugin, however.
contents | to the top | preceding chapter
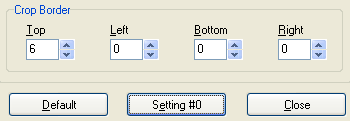
The Zoom Window (see „Settings/ Zoom“) allows to configure up to three different settings and toggle between them, e.g. for adapting to a 16:9 monitor, or stretching a 4:3 picture embedded in a 16:9 stream to the full 4:3 display size. Additionally it provides a crop feature.
Proceed as follows:
![]() Configuration: Click the „Setting #0“
Button. The caption changes to „Setting #1. Now use the
sliders to adjust the size and position of the TV picture. Proceed
accordingly for „Setting #2“.
Configuration: Click the „Setting #0“
Button. The caption changes to „Setting #1. Now use the
sliders to adjust the size and position of the TV picture. Proceed
accordingly for „Setting #2“.
![]() Toggle: Click „Setting #2“ to let Setting
#0 take effect. The next click activates Setting #1, and so forth.
Alternatively you may use the keyboard or remote control, after
assigning a key to the „Zoom Setting Plus“
command under „Settings/ Options/ Control“.
Toggle: Click „Setting #2“ to let Setting
#0 take effect. The next click activates Setting #1, and so forth.
Alternatively you may use the keyboard or remote control, after
assigning a key to the „Zoom Setting Plus“
command under „Settings/ Options/ Control“.
The number of configurable / selectable
settings can be changed by editing the file Setup.ini
Cropping: The „Crop Border“ section enables copping a number of scan lines / columns at the picture edges, in order to hide disturbances (especially useful for watching 16:9 broadcasts on a 4:3 screen) or unused black borders. The video renderer stretches the cropped picture, so that the extent of the display area remaines unchanged.
Use the Up-Down Buttons to change the number of cropped lines / columns at the edges. The video renderer rounds odd numbers up to the next even number. Like the slider positions, three different crop settings can be stored under Setting #0..#2.
contents | to the top | preceding chapter
The new command line parameter -x enables sending all commands to DVBViewer GE that are listed under „Settings/ Options/ Control“, e.g. by using a script, batch file or desktop shortcut. The parameter -x takes effect both when DVBViewer GE is launched and already running. It proved to be useful for controlling DVBViewer GE via remote control by using Girder.
The command is specified by appending a number to -x, e.g. „DVBViewer.exe -x37“ lets DVBViewer GE open the EPG window. The following table shows the available commands and the associated numbers:
|
Pause on/off |
0 |
Favourite 0 |
38 |
OSD up |
78 |
|
Always on top on/off |
1 |
Channel 0 |
40 |
OSD down |
79 |
|
Show menu on/off |
2 |
Channel 1 |
41 |
OSD first |
80 |
|
Show statusbar on/off |
3 |
Channel 2 |
42 |
OSD last |
81 |
|
Show toolbar on/off |
4 |
Channel 3 |
43 |
OSD previous page |
82 |
|
Full screen on/off |
5 |
Channel 4 |
44 |
OSD next page |
83 |
|
Close DVBViewer |
6 |
Channel 5 |
45 |
OSD close |
84 |
|
Open Channellist Window |
7 |
Channel 6 |
46 |
EPG Info Now |
90 |
|
Channel minus |
8 |
Channel 7 |
47 |
EPG Info Next |
91 |
|
Channel plus |
9 |
Channel 8 |
48 |
Play |
92 |
|
Open Favourite Window |
10 |
Channel 9 |
49 |
Stop |
93 |
|
Favourite 1 |
11 |
Start/Stop timeshift |
50 |
Open file |
94 |
|
Favourite 2 |
12 |
Rebuild Playback |
53 |
Audio center/left/right |
95 |
|
Favourite 3 |
13 |
Brightness plus |
55 |
DVD menu up |
96 |
|
Favourite 4 |
14 |
Brightness minus |
56 |
DVD menu down |
97 |
|
Favourite 5 |
15 |
Saturation plus |
57 |
DVD menu left |
98 |
|
Favourite 6 |
16 |
Saturation minus |
58 |
DVD menu right |
99 |
|
Favourite 7 |
17 |
Contrast plus |
59 |
DVD menu select |
100 |
|
Favourite 8 |
18 |
Contrast minus |
60 |
OSD Teletext on/off |
101 |
|
Favourite 9 |
19 |
Hue plus |
61 |
Fast rewind |
102 |
|
Favourite minus |
20 |
Hue minus |
62 |
Fast forward |
103 |
|
Favourite plus |
21 |
Previous channel |
63 |
Zoom plus |
104 |
|
Change aspect ratio |
22 |
Open Playlist |
64 |
Zoom minus |
105 |
|
Open Zoom Window |
23 |
Playlist first |
65 |
Stretch horizontal plus |
106 |
|
Open Options Window |
24 |
Playlist next |
66 |
Stretch horizontal minus |
107 |
|
Mute |
25 |
Playlist previous |
67 |
Stretch vertical plus |
108 |
|
Volume plus |
26 |
Playlist last |
68 |
Stretch vertical minus |
109 |
|
Volume minus |
27 |
Playlist stop |
69 |
Zoom default |
110 |
|
Brightn./Contrast Window |
28 |
Playlist random |
70 |
Show OSD |
111 |
|
Desktop mode |
32 |
Hide menu, status/toolbar |
71 |
Play next |
112 |
|
Open Scheduler Window |
33 |
Change audio channel |
72 |
Play previous |
113 |
|
Start/Stop recording |
34 |
OSD show/select |
73 |
Play DVD |
114 |
|
Open Teletext Window |
35 |
OSD red |
74 |
Screenshot |
115 |
|
EPG Info on/off |
36 |
OSD green |
75 |
Disable Playback |
116 |
|
Open EPG Window |
37 |
OSD yellow |
76 |
Zoom settings plus |
117 |
|
|
|
OSD blue |
77 |
Previous file |
118 |
contents | to the top | preceding chapter
![]() The OSD teletext (switchable via F12) automatically detects
subtitle pages and displays them accordingly by limiting the
teletext display area to the subtitles. The transparency can be
adjusted under „Settings/ Options/ DirectShow/ OSD
Transparency“.
The OSD teletext (switchable via F12) automatically detects
subtitle pages and displays them accordingly by limiting the
teletext display area to the subtitles. The transparency can be
adjusted under „Settings/ Options/ DirectShow/ OSD
Transparency“.
![]() Favourite channels with more than one digit can be selected
via keybord ([Shift] + [0]..[9] or remote control. The first
(topmost) favourite channel is number 0. After each keystroke a
channel switching delay of two seconds lets DVBViewer GE wait for
additional input. However, assumed there 25 favourites, and you
press 3, it is clever enough to switch over immediately to channel
3, since there is no channel 30 or above. The same applies to
selecting the channels of the channellist (keys [0]..[9]).
Favourite channels with more than one digit can be selected
via keybord ([Shift] + [0]..[9] or remote control. The first
(topmost) favourite channel is number 0. After each keystroke a
channel switching delay of two seconds lets DVBViewer GE wait for
additional input. However, assumed there 25 favourites, and you
press 3, it is clever enough to switch over immediately to channel
3, since there is no channel 30 or above. The same applies to
selecting the channels of the channellist (keys [0]..[9]).
![]() You may copy a whole category folder, including its content, by drag
and drop to the Favourites Window.
You may copy a whole category folder, including its content, by drag
and drop to the Favourites Window.
![]() Slightly improved graphical design of the EPG timeline in the
EPG Window.
Slightly improved graphical design of the EPG timeline in the
EPG Window.
![]() „Settings/ Options/ Control“ provides additional
functions that can be assigned to a (remote control) key. The
list has been rearranged.
„Settings/ Options/ Control“ provides additional
functions that can be assigned to a (remote control) key. The
list has been rearranged.
![]() „DVB Viewer/ Previous File“ allows to resume
playback of the last played file or DVD – exactly at the
position where it was interrupted. Before „Channel/
Previous Channel“ had to do the job for channels and
files, thus not letting you return to a file after switching over to
TV and then changing the channel. Two separate functions provide
more flexibility.
„DVB Viewer/ Previous File“ allows to resume
playback of the last played file or DVD – exactly at the
position where it was interrupted. Before „Channel/
Previous Channel“ had to do the job for channels and
files, thus not letting you return to a file after switching over to
TV and then changing the channel. Two separate functions provide
more flexibility.
![]() „View/ Filters“ shows all DirectShow filters,
that are currently used for playback, not only those with a property
page (which saves launching GraphEdit in many cases).
„View/ Filters“ shows all DirectShow filters,
that are currently used for playback, not only those with a property
page (which saves launching GraphEdit in many cases).
![]() Improved aspect ratio detection for other video formats than
MPEG2 (e.g. AVI, DivX), plus improved AC3 audio format detection.
The statusbar signals Dolby Digital 5/1 broadcasts in red,
2/0 broadcasts in blue.
Improved aspect ratio detection for other video formats than
MPEG2 (e.g. AVI, DivX), plus improved AC3 audio format detection.
The statusbar signals Dolby Digital 5/1 broadcasts in red,
2/0 broadcasts in blue.
![]() Disabled Audio Selection Filter in case of AC3 playback (due
to trouble with SPDIF passthrough mode).
Disabled Audio Selection Filter in case of AC3 playback (due
to trouble with SPDIF passthrough mode).
contents | to the top | preceding chapter
DVBViewer GE saves all settings in the configuration file Setup.ini. Since it is a text format, it can be opened and changed with a text editor. DVBViewer GE must be closed before.
INI files are divided in sections; the section names are put in squared brackets. All subsequent lines belong to the section. By changing or adding lines DVBViewer GE can be adapted to special needs. Some of the possibilities are listed below. Search the according section name, and then insert the line(s) below it.
[frmEPG]
PVRAutoPopup=0
The line PVRAutoPopup=0 in section [frmEPG] prevents the Scheduler Window from popping up when a scheduled recording is added by clicking „Send to PVR“ in the EPG Window.
[frmMain]
SkipIntervalShort=10
SkipIntervalLong=60
NoCue=1
ShowInTaskBar=1
LNBOff=0
SkipIntervalShort in section [frmMain]
sets the number of seconds are skipped in a (timeshift-) file when
clicking
![]() or
or
![]() in the controlbar. Insert this line with a different value, if you
want a shorter or longer interval than 10 seconds.
in the controlbar. Insert this line with a different value, if you
want a shorter or longer interval than 10 seconds.
SkipIntervalLong accordingly sets the skip
interval for the buttons
![]() and
and
![]() (60 seconds by default).
(60 seconds by default).
The line NoCue=1 replaces DVD cue-play by
skipping (as configured for file playback) when you click
![]() or
or
![]() in the control bar.
in the control bar.
The line ShowInTaskBar=1 lets DVBViewer GE show up in the Windows taskbar, in addition to the tray icon.
Adding the Line LNBOff=0 in the [frmMain] section prevents DVBViewer GE from switching the LNB power supply off when it is closed or set to standby mode (via commandline parameter -c).
An additional line in section [frmZoom] changes the number of selectable presets in the Zoom Window, e.g. from 3 to 5:
[frmZoom]
NrOfSettings=5
contents | to the top | preceding chapter