DiSEqC Settings
DiSEqC – Digital Satellite Equipment Control
– has been introduced by the European satellite provider
Eutelsat as an
open standard. It enables receivers to control peripheral hardware
such as LNBs, multi-dish switches and antenna rotors. In most cases
DiSEqC is used for switching between satellite positions. There are
different DiSEqC levels. TransEdit supports DiSEqC up to level 1.2
(which means, up to 64 satellite sources and motorized dishes),
provided the DVB-S card and driver allow to send such DiSEqC
commands.
General Remarks
| DiSEqC Selection | DiSEqC
Editor | Positioner Console
General Remarks
Sometimes DiSEqC does not work as expected. There
are several reasons for it:
 Microsoft has missed to define a clear unified method for sending
DiSEqC commands via the BDA interfaces (Broadcast Driver
Architecture). Therefore every vendor of DVB-S devices uses a
different method, or with other words, DiSEqC has to be implemented
vendor-specific in an application. Some vendors only provide very
poor documentation about their „private“ DiSEqC
interface, some not at all. Often enough user feedback, trial and
error are the only means to solve resulting problems. DVBViewer and
TransEdit can only support DiSEqC for a specific DVB-S device if the
interface is sufficiently known.
Microsoft has missed to define a clear unified method for sending
DiSEqC commands via the BDA interfaces (Broadcast Driver
Architecture). Therefore every vendor of DVB-S devices uses a
different method, or with other words, DiSEqC has to be implemented
vendor-specific in an application. Some vendors only provide very
poor documentation about their „private“ DiSEqC
interface, some not at all. Often enough user feedback, trial and
error are the only means to solve resulting problems. DVBViewer and
TransEdit can only support DiSEqC for a specific DVB-S device if the
interface is sufficiently known.
The interface of some vendors is limited to the basic DiSEqC 1.0
Pos/Opt commands. In this case DVBViewer and TransEdit cannot
support cascaded switches (DiSEqC 1.1) or a positioner (DiSEqC 1.2).
There are devices (particularly TechniSat SkyStar2) that provide a
DiSEqC 1.1/1.2 interface, but the driver blocks according commands
in order to avoid damage caused by the high power consumption of
motorized dishes.
DVB-S cards must generate the voltage for supplying switches, LNBs
and positioners from the voltages that are available in a PC, thus
being not so powerful as receivers with a dedicated power supply.
Additionally it is more difficult in a PC to achieve an accurate
DiSEqC timing. That is why sometimes a receiver is able to perform
switching without problems, but not a DVB-S card connected to the
same antenna cable – it may depend on the type of DVB-S
device, its driver and the tolerance of the switch.

The situation is complicated even more by
companies selling relabeled hardware of other companies, sometimes
with modified drivers. If you are not sure which DiSEqC Level is
supported by your DVB-S device or which device is suitable for your
needs, search the DVBViewer
Forum or ask other users for their experience. In some cases even
the DVBViewer developers do not know whether it works or not, because
it is impossible to test all available devices under all
circumstances.
contents |
to the top | preceding
chapter | next chapter
DiSEqC Selection in the
Main Window
The left side of the TransEdit Main Window
provides a dropdown list for assigning a DiSEqC setting to the
selected transponder list resp. satellite position:
None: If DiSEqC is set to None, TransEdit and DVBViewer send
no DiSEqC commands at all - the appropriate setting if you are only
receiving a single satellite position, and no switch is involved
that requires DiSEqC commands, e. g. if your DVB-S card is directly
connected to a Single or Dual (Twin) LNB. Other DiSEqC settings will
have no effect in this case, except slowing down channel switching
and scanning slightly.
Simple A/B: These settings are suitable for simple two-way
switches without DiSEqC microcontroller that are only able to
respond to analogue tone burst signals („Mini DiSEqC“
for switching between two satellite positions). However, these
switches are outdated, rarely used nowadays and supported
insufficiently by DVB-S card manufacturers, so chances are that it
will not work. Only use Simple A/B if you are sure that your
DVB-S card is connected to such a tone burst switch.
PosA/OptA...PosB/OptB: These settings (also called Input
1...4) refer to the common DiSEqC 1.0 commands for switching between
up to four different satellite positions. Try them first, one
after the other, if you are not sure which setting is required.
Click Apply after having selected one of them, and try to scan.
Preset Position (also called „Go to Satellite Position
nn“) can be used for motorized dishes. The according DiSEqC
command lets the motor drive to a certain position, either
pre-stored in the positioner unit ROM or user-defined with the Store
Preset command in the TransEdit Positioner Console. A number in the
range of 0...255 is assigned to each position, where 0 is reserved
as reference position (normally corresponding to due south).
Selecting Preset Position lets an input field appear allowing you to
enter the number of the desired position.
Angular Position (also known as USALS, Universal Satellite
Automatic Location System) is a more convenient way to drive the
motor to a satellite position, provided the positioner unit supports
it. „Angular Position“ avoids having to search
and store every single position manually. Recommendable are the
motors from STAB Italy, the developer of this system. This setting
lets TransEdit calculate the motor angle from the satellite orbital
position and the latitude/longitude of your site and send the result
as DiSEqC command to the positioner. „Angular Position“
requires a correct satellite orbital position (editable in the
Main Window) and entering once the latitude and longitude of your
site in the Positioner Console.
Extended: Selecting this option opens the DiSEqC
Editor Window (see below) and – for accessing it later -
lets an Edit Button appear in the Main Window. „Extended“
is the expert mode enabling user-defined DiSEqC command sequences.
Hints for DVBViewer Pro: Go to the
Channel Editor. Select a root folder representing a satellite
position. Select the required DiSEqC setting in the DiSEqC Drop-down
List. In case of „Preset Position“ an input field
appears. Enter the number referencing the desired satellite position
(see above). In case of „Angular Position“ make
sure that the orbital position is entered correctly, as shown in the
TransEdit Main Window. Additionally DVBViewer needs to know the
latitude and longitude of your site for calculating the „Angular
Position“ command. It will prompt you to enter them, if not
yet done. More hints concerning the „Extended“
setting are given at the end of the DiSEqC Editor section (see
below).
Finally click „Apply“
in order to update all contained channels to the new settings. Please
note: Though DVBViewer Pro allows to set DiSEqC per channel, it
is strongly recommended not to mix up different DiSEqC settings
within a root folder, in order to keep the channellist clearly
arranged and the handling easy.
Hints for DVBViewer GE: Select a
root folder in the channel list. Open the DVB Network Properties by
clicking the Properties Tool Button at the bottom. Select the
required DiSEqC Setting in the DiSEqC Dropdown List. In case of
„Preset Position“ an input field appears. Enter
the number referencing the desired satellite position (see above). In
case of „Angular Position“ or „Extended“
make sure that the orbital position is entered correctly, as shown in
the TransEdit Main Window. Additionally DVBViewer needs to know the
latitude and longitude of your site for calculating „Angular
Position“ commands.„Extended“ requires
having entered a DiSEqC command sequence for this satellite position
in TransEdit before (see below).Finally click Apply.
contents |
to the top | preceding
chapter | next chapter
The DiSEqC Editor
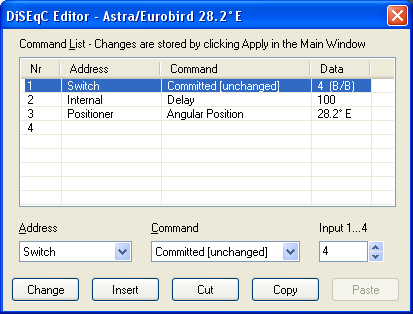 The
DiSEqC Editor - as an extension of the TransEdit Main Window - allows
entering a sequence of DiSEqC commands, which is essential in case of
cascaded DiSEqC elements (e.g. a positioner behind a switch)
requiring to send more than one DiSEqC command per satellite
position. Additionally the DiSEqC Editor may be used for fine-tuning
the single commands listed above, e.g. by adding delays or by letting
TransEdit send them repeatedly, which may help if the communication
between your DVB-S device and a switch doesn't work reliably.
The
DiSEqC Editor - as an extension of the TransEdit Main Window - allows
entering a sequence of DiSEqC commands, which is essential in case of
cascaded DiSEqC elements (e.g. a positioner behind a switch)
requiring to send more than one DiSEqC command per satellite
position. Additionally the DiSEqC Editor may be used for fine-tuning
the single commands listed above, e.g. by adding delays or by letting
TransEdit send them repeatedly, which may help if the communication
between your DVB-S device and a switch doesn't work reliably.

Clicking „Apply“
in the Main Window assigns a (changed) sequence to the
selected transponder list resp. satellite position and stores it in
the file DiSEqC.xml (resp. DiSEqC.ini in case of a DVBViewer GE
installation), that is located in the Configuration Folder (see
„Info/ Configuration Folder“ in TransEdit).
Selecting another transponder list in the Main
Window without having clicked „Apply“ discards all
changes in the Editor Window
A DiSEqC sequence is a series of commands. Adding
a command to a sequence starts with selecting an address (where the
command shall go), followed by selecting the command and entering a
data value. The following addresses and commands are available:
Internal: The command is processed by TransEdit internally,
not sent to external hardware. The only command in this category is
Delay: Lets TransEdit wait x
milliseconds before sending the next command resp, continuing with
the tuning process. A delay may be necessary in case of cascaded
DiSEqC elements. E. g. if a command selects Input 1 of an
Uncommitted Switch (see below), and this input is connected to a
Committed Switch, the second switch will probably need some time to
power up, until it is ready to receive a command addressed to it.
Furthermore delays may be helpful to solve DiSEqC problems with
certain DVB-S devices or switches that need a pause between a DiSEqC
command and the subsequent tuning process.
TransEdit usually inserts a delay of 100
ms after sending one of the Pos/Opt-, Preset and Angular Position
commands described above, in order to make them more fail-safe. But –
for maximum flexibility – TransEdit will insert no default
delay if the command is part of a sequence defined in the DiSEqC
Editor, but will leave inserting delays to you.
Switch: A switch usually selects one out of two or more LNBs
and connects it to your DVB-S device. The following commands are
available for switches:
Committed [Unchanged]: A Committed
Switch is the most common type. It provides 4 inputs for 4 LNBs
resp. satellite positions, also called PosA/OptA, PosB/OptA... you
already know that. However, there is a difference to the Pos/Opt
commands that are selectable in the Main Window. The „Unchanged“
type is not updated – please read on:
Committed {Updated}: Besides two bits
for Pos/Opt A/B, a Committed Switch command contains two additional
bits for selecting vertical / horizontal polarization and the low /
high frequency band. Setting these bits is sometimes required in
shared installations with Quatro LNBs providing 4 separate outputs
for low/vertical, low/horizontal, high/vertical and high/horizontal.
TransEdit and DVBViewer update these bits in the „Committed
{Updated}“ command according to the transponder and send
the command each time when the polarization or frequency band
changes. The Pos/Opt commands in the Main Window drop-down list are
of the „Updated“ type, because they are supposed to work
under all circumstances. However, in many cases this is just a waste
of time, thus slowing down channel switching, because the voltage
(13/18V) and the 22 kHz signal (off/on) are sufficient for switching
between H/V and High/Low.
Therefore you may want to replace the
(updated) Pos/Opt commands that are selectable in the TransEdit Main
Window by switching to „Extended“ and by inserting
according „Committed [Unchanged]“ commands in the
DiSEqC Editor in order to speed up scanning and channel switching.
Additionally you may omit the 100 ms delay – try if it works.
Uncommitted: Using an Uncommitted
Switch is mandatory for installations with cascades switches –
usually the receiver is connected to the Uncommitted Switch, that is
connected to one or more Committed Switches. You don't have to
understand the meaning of „committed“ and „uncommitted“
in this context (hardly anybody does). Just keep in mind that two
different kinds of switches are required in this case, because it
must be clear – by different commands – which switch is
addressed. So the first command of an according DiSEqC sequence will
usually select the input of the Uncommitted Switch (one out of 16),
and – after a delay – the second command the input of a
Committed Switch (one out of 4), yielding a maximum of 16 x 4 = 64
selectable LNBs resp. satellite positions.
Preset Position: Lets the motor drive
to a pre-stored position referenced by a number in the range of 0 to
255. Equals the „Preset Position“ command that is
selectable in the Main Window (see above), but can be used here as
part of a DiSEqC sequence, e. g. if the positioner is connected to a
switch or if the 100 ms default delay after sending the command is
not appropriate.
Angular Position: Lets TransEdit
calculate the motor angle and send the result as DiSEqC command to
the positioner. Equals the „Angular Position“ command
that is selectable in the Main Window (see above), but can be used
here as part of a DiSEqC sequence. Please note: This command
requires entering the latitude and longitude of your site in the
Positioner Console!
The entered DiSEqC commands are collected in the
Command List that represents the DiSEqC sequence The following Editor
Commands refer to the selected entry resp. entries. For
multi-selection, keep the Ctrl or Shift key pressed while clicking
entries in the list.
Change: Changes the selected entry in the list according to
the entered DiSEqC command.
Insert: Inserts a DiSEqC command at the selected position.
The last entry of the list is always empty. Select it for appending
a DiSEqC command.
Cut: Deletes the selected DiSEqC commands from the list and
moves them to the internal TransEdit clipboard. At the same time
they are stored as text in the Windows clipboard.
Copy: Copies the selected DiSEqC commands to the internal
TransEdit clipboard without deleting them. At the same time they are
stored as text in the Windows clipboard.
The text representation of the DiSEqC
commands -as stored in the Windows clipboard – is suitable for
inserting it in the DiSEqC Editor of DVBViewer Pro 4.0.0.0 or earlier
versions.
Copy and Paste are useful if you want to enter a
lot of similar command sequences for different satellite positions.
The Context Menu, that appears after right-clicking the
Command List, additionally provides a Select All and Delete
command.
Hints for DVBViewer Pro: DVBViewer
Pro adopts DiSEqC command sequences defined in TransEdit and provides
its own DiSEqC Editor. Most of the instructions given here apply to
it. Go to the Channel Editor. Select a root folder representing a
satellite position. Select „Extended“ in the
DiSEqC Dropdown List. Make sure that the orbital position is entered
correctly, as shown in the TransEdit Main Window. Click „Apply“
in order to update all contained channels to this setting. Then click
„Edit“ to open the DiSEqC Editor. After having
entered or changed a command sequence, click
Apply in the Editor Window.
Hints for DVBViewer GE: DVBViewer
GE does not provide a DiSEqC Editor, but is able to execute DiSEqC
command sequences that have been defined before in TransEdit. Select
a root folder in the channel list. Open the DVB Network Properties by
clicking the Properties Tool Button at the bottom. Make sure that the
orbital position is entered correctly, as shown in the TransEdit Main
Window. Set DiSEqC to „Extended“ and click
„Apply“.
contents |
to the top | preceding
chapter | next chapter
The Positioner Console
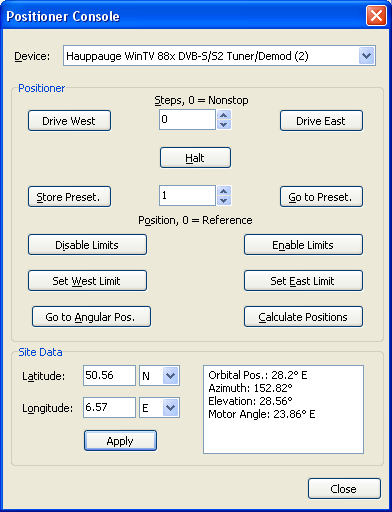 The
Positioner item in the TransEdit Main Menu opens the Positioner
Console. It is only available if a DiSEqC 1.2 capable device is
listed under „Settings/ Hardware“. The Positioner
Console provides commands for setting up and adjusting a motorized
dish, and allows to enter your site latitude and longitude, that are
required for sending Angular Position commands. If a satellite
transponder list is selected in the Main Window, the console
additionally displays site-dependent angles calculated by TransEdit
(azimuth and elevation of the satellite position, motor angle).
The
Positioner item in the TransEdit Main Menu opens the Positioner
Console. It is only available if a DiSEqC 1.2 capable device is
listed under „Settings/ Hardware“. The Positioner
Console provides commands for setting up and adjusting a motorized
dish, and allows to enter your site latitude and longitude, that are
required for sending Angular Position commands. If a satellite
transponder list is selected in the Main Window, the console
additionally displays site-dependent angles calculated by TransEdit
(azimuth and elevation of the satellite position, motor angle).
The first step is selecting the DVB-S device
in the Device Dropdown List – of course the one that is
connected to the positioner unit. The Console initializes and
„occupies“ the device as soon as you click one of the
Command Buttons described below. If it is already occupied by a
running DVBViewer instance, you will get an error message.
If your positioner unit is connected to a
switch, the Console may need to send DiSEqC command sequences instead
of single commands. In this case, first enter the sequence for a
satellite position in the DiSEqC Editor. Insert
at least one positioner command („Preset Position“
or „Angular Position“) and click „Apply“
in the TransEdit Main Window. Make sure that the satellite position
is selected. After that, the Positioner Console will output this
sequence when you click one of the Command Buttons, but replace all
contained positioner commands (including repeated commands) by the
command assigned to the Button.
The Positioner Console provides the following
commands:
Drive West/East: Clicking these buttons drives the motor to
the west resp. east. If the „Steps“ value is
zero, the motor moves continuously until you release the button,
letting the Console send a Halt Command. If „Steps“
is non-zero, clicking the buttons lets the motor make the according
number of steps (provided the positioner unit supports it), thus
allowing to „nudge“ the motor in the desired direction.
A step typically is the smallest angular movement of the antenna
shaft.
„Drive West/East“
allows to search a satellite position. In order to get
feedback, start the TransEdit Analyzer. Let it receive a transponder
on the satellite position in question that will for sure deliver
data. Additionally make sure that the Analyzer uses the same device
as the Console, by setting it to „Preferred“ on
„Settings/ Hardware“,
if necessary. Now move the motor until the Analyzer receives a
signal with the highest possible quality (if the device driver
provides useful signal information, not all do) and data without a
continuously increasing number of missing packets. Finally store this
position by using the „Store Preset“ command.
Halt can be used as emergency break if the motor does not
stop as expected. When the motor is supposed to move continuously
(Drive West/East with Steps = 0), the Positioner Console sends a
„timed“ command, advising the motor to move only for 3
seconds, but repeats this command every 2 seconds. So the motor
should stop automatically after at most 3 seconds, even if it does
not receive the Halt Command. However, positioner units that are not
supporting timed commands will go on moving if they don't receive a
Halt Command.
Store Preset: Stores the present motor position under the
number that is set in the Position Input Field and enables the
limits (see below). 0 is reserved as reference position and cannot
be used to store a user defined position.
Goto Preset moves the motor to the pre-stored position set in
the Position Input Field. It stops automatically if it reaches the
west or east limit.
Disable Limits disables both „soft“ limits (west
and east), that are stored in the positioner unit. The command
allows the motor to drive over its full (mechanically-defined)
range, when using the „Drive West/East“ commands.
„Disable Limits“ has
to be used with care, because the attempt to drive the motor beyond
its „hard“ physical limits may cause damage. Therefore
the Positioner Console displays a warning, allowing you to cancel the
command before it is sent.
Enable Limits enables both „soft“ limits (west
and east), that are stored in the positioner unit.
Set West/East Limit stores the present motor position as
„soft“ limit in the positioner unit. Usually positioners
will execute this command only if the limits are at present disabled
(in order to prevent accidental changes), and automatically enable
the limit. Please refer to the positioner manual for more
information.
Go to Angular Position is only available if a transponder
list representing a satellite position is selected in the TransEdit
Main Window. The command drives the motor to the satellite position,
provided the positioner unit supports such commands and the site
latitude and longitude have been stored correctly with „Apply“.
Calculate Positions lets the motor unit (re-)calculate all
satellite positions stored in its memory relative to a known
position that has been adjusted manually to the best signal quality
before (e.g. with the „Drive East” and „Drive
West” commands). TransEdit only provides the basic form of
this command without parameters. It may not be supported by the
positioner. Please consult the manual of your motor unit
The PDF document „Positioner Application
Note“ from Eutelsat
contains additional (technical) information about the commands
described above.
Site Data Section: For calculating „Angular
Position“ commands TransEdit needs to know the Latitude
and Longitude of your site. Enter them in the Site Data
Section. If you don't know them, search the web – there are a
lot of Internet Services providing such information. Clicking Apply
lets TransEdit write the latitude and longitude to the file
DiSEqC.xml (resp. DiSEqC.ini in case of a DVBViewer GE installation),
that is located in the Configuration Folder (see „Info/
Configuration Folder“ in TransEdit).
Hints for DVBViewer Pro: DVBViewer
Pro does not provide a Positioner Console. However, the latitude and
longitude can be entered or changed by clicking the Site Button in
the Channel Editor. The Site Button appears if DiSEqC is set to
„Angular Position“ or „Extended“.
Hints for DVBViewer GE: DVBViewer
GE does not provide a Positioner Console, but allows to enter or
change the latitude and longitude in the DVB Network Properties, if
DiSEqC is set to „Angular Position“ or „Extended“.
Select a root folder in the channel list and open the DVB Network
Properties by clicking the Properties Tool Button at the bottom.
contents |
to the top | preceding
chapter | next chapter