The Channels Tab
Program and program element selection for a
recording on the Channels Tab is the point where using the
Videorecorder Plugin gets a bit tricky, since it allows more than
just selecting a channel. So it is a good idea to learn about DVB
structures first.
Basic DVB Structures
| Selecting Programs and Elements | Changing
the Default Selection | Scheduled Recordings
| Channel Selection for Scheduled Recordings |
PID Dump / Transponder Recording
Basic DVB Structures
Transport
stream is a special way of packaging MPEG2 video and audio data
for transport purpose, e.g. via satellite - in a kind of suit case,
so to say. A DVB transport stream mostly contains a mixture of
several multiplexed programs (channels), that are composed of
program elements like video, audio and videotext streams. Each
data packet carries a number, the Packet Identifier (PID),
indicating to which stream it belongs.
Since the receiver must know which stream contains
what and to which program it belongs, the transport stream
additionally contains tables:

 The
Program Association Table (PAT) lists all programs that are
available in the stream as numbers (the Service ID, SID) and assigns
a PMT PID to each of them. That is the Packet Identifier of another
table with further information.
The
Program Association Table (PAT) lists all programs that are
available in the stream as numbers (the Service ID, SID) and assigns
a PMT PID to each of them. That is the Packet Identifier of another
table with further information.
The Program Map Table (PMT) lists all program elements
belonging to a program and their associated PIDs, enabling the
receiver to know exactly „This data packet belongs to channel
xyz and is part of a video stream“.
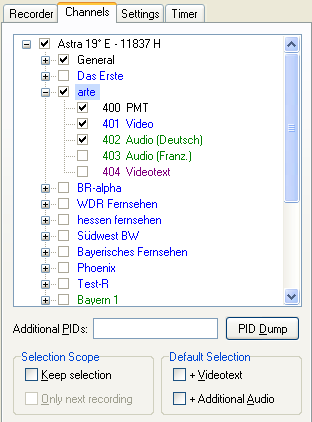
The tree view on the Channels Tab reflects this
hierarchic structure. It allows to select what shall be recorded by
ticking the entries:
The root level represents the whole transport stream that is
broadcasted on the currently tuned frequency via a transponder.
The second level represents the contained programs. TV channels are
displayed in blue, radio channels in
green.
The third level contains the elements of each program, their stream
type and the associated PIDs in different colors.

The Videorecorder Plugin reads the
channel data from the DVBViewer's channellist (from the file
channels.dat) when the DVBViewer is launched. Changes in the
DVBViewer's channellist (e.g. new channels) have no effect on the
Videorecorder Plugin unless you close and re-launch the DVBViewer.
The General Section at the top contains
streams resp. PIDs that are not associated with a specific program,
among them the PAT (important for TS recordings) plus some other
tables (e.g. the EPG stream), which usually are not required.
However, DVB experts may want to record them for special purpose,
e.g. for analyzing the data.
The PCR (Program Clock Reference), that
sometimes shows up as a program element, contains important timing
information. Usually it is already included in the video or audio
stream, but some broadcasters prefer to transmit it in a separate
stream, in order to coordinate different programs. In case of TS
recordings this entry should always be ticked. The TSPlayer works
less precisely and can not convert to MPG without it, and other
software may fail completely.
contents |
to the top | preceding
chapter | next chapter
Selecting Programs and
Elements
TS is the only format that allows to
record multiple channels with multiple audio streams or videotext.
All other formats are restricted to a single channel with a single
video and audio stream (though MPG is designed for containing
multiple audio streams of a program, but in contrast to DVBViewer
Pro/GE the Videorecorder Plugin does not support it).
If the selected format is not TS, the
Plugin only accepts one channel. If you tick a second program, the
first one will be disabled. However, this can be circumvented by
selecting elements instead of a programs. In case of a
multi-selection for MPG the Videorecorder Plugin records the first
channel from the top, in which a video or audio stream is ticked. If
two or no audio streams are selected within the program, the Plugin
takes the first one. Videotext is ignored.
In case of MPG, M2P, PVA or MP2 recordings you
don't have to bother about PAT, PMT and PCR. The Videorecorder Plugin
will use automatically what it needs. However, if a program contains
multiple audio channels, make sure that the desired one is ticked.
If the selected format is TS, you can do
what you like – provided you know what you do. The
Videorecorder Plugin will accept everything and record your selection
„as it is“, regardless wether it makes sense or not. A
solid selection for a TS recording should contain the following
elements:
The PAT from the General Section
The PMT and, if available, the PCR for each program that shall be
recorded, plus the desired video, audio and videotext streams, of
course.
If PAT and/or PMT are missing in a TS file, it is
very difficult for players to find out how it must be played,
especially if two ore more channels have been recorded in one file.
In most cases the TSPlayer, as a TS specialist, will still be able to
determine which video and audio streams belong together (by comparing
their time stamps), thus enbling playback and conversion – but
it is not guaranteed. For other software a file with two or more
programs without any „what belongs to which“ information
is more or less unusable.
contents |
to the top | preceding
chapter | next chapter
Changing the Default
Selection
Whenever a channel is tuned in the DVBViewer
(including „Rebuild Graph“ operations and such), the
Videorecorder Plugin refreshes its list and selects by default the
current channel and the required elements:
the PAT in the General Section
the PMT, the video stream (if available), the first audio stream and
the PCR (if available) in the current channel's element list.
The same basic selection is performed if a
scheduled recording is executed (according to the channel the task
has been programmed for), or if you tick a program checkbox. In the
latter case, you have to take care of the correct audio stream, if
there are more than one, since the Videorecorder Plugin always
selects the first one from the top.

The order of audio streams corresponds to
the channel order in the DVBViewer's Channelist Window. If you
preferably record a channel with a specific audio stream (e.g. AC3),
it is recommendable to move the according channellist entry up, so it
sits above entries with other audio streams of the same channel.
Two checkboxes allow to change the default
selection:
The
+ Videotext Checkbox lets the Videorecorder Plugin
additionally select the videotext element of the channel, if
available.
The
+ Additional Audio Checkbox lets the Videorecorder Plugin
select all available audio streams of the channel.
Thus, after ticking both checkboxes, all program
elements will be selected by default.
In some cases you may want to keep a special
selection (e.g. a prepared selection for a scheduled recording), even
when a different channel ist tuned in the DVBViewer. Two checkboxes
in the Selection Scope part of the Channels Tab serve this
purpose:
Ticking
the Keep Selection Checkbox freezes the current selection,
until you un-tick it again. Furthermore it lets the Videorecorder
Plugin save the selection in the VRPlugin.ini file when the
DVBViewer is closed and restore it when the DVBViewer is
re-launched.
The
Only Next Recording option lets the Video Recorder Plugin
switch Keep Selection off automatically after the recording is done,
so you don't have to remember to un-tick it.
The Videorecorder Plugin does not check
wether a „frozen“ selection matches the currently tuned
transponder, when a recording starts. You have to take care of it. If
it doesn't match, some mess will be recorded, or nothing at all.
Last not
least something for true DVB nerds: Since the tree view only contains
the elements and PIDs that are present in the DVBViewer's channel
list, the Channels Tab provides the Additional PIDs Input Line.
For „very special“ recordings you may enter additonal
PIDs as decimal numbers, separated by commas. If „Keep
Selection“ is ticked, they are saved in the VRPlugin.ini file
and restored as well.
contents |
to the top | preceding
chapter | next chapter
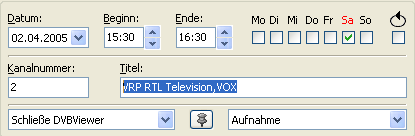
Scheduled Recordings
Scheduled
recordings for the Videorecorder Plugin can be programmed in the
DVBViewer's Recorder Window (Scheduler Window in DVBViewer GE).
Select „Video Recorder Plugin“ in the dropdown
list at the lower right.
The
Videorecorder Plugin records the channel for which the recordings has
been scheduled in the DVBViewer, with the default selection of
program elements, as described above, and other settings like the
file format that you have adjusted in the Plugin Window before.
DVBViewer
Pro/GE natively support recording two or more channels at the
same time. So there is no need to use the Videorecorder Plugin for
it, except for scheduled recordings that require special plugin
capabilities.
In DVBViewer Pro you may control an ongoing
scheduled Plugin recording in the DVBViewer's Recorder Window,
without opening the Plugin Window. After
selecting an ongoing recording (status „Recording“),
that is executed by the Videorecorder Plugin, you can do the
following:
Adjust
the end time and the action after recording: Enter the new end
time or select the action in the dropdown list at the lower left and
click „Update“.
Stop
the recording: Click the „Stop“ or „Remove“
button. The recording will also be stopped, if you deactivate it by
unticking the checkbox of the according entry in the list.
Both, DVBViewer Pro and DVBViewer GE,
check the recording state of the plugin and will display a warning in
case of an action that would stop a recording.
contents |
to the top | preceding
chapter | next chapter
Channel Selection for
Scheduled Recordings
The
automatic Videorecorder Plugin channel selection for scheduled
recordings is sufficient in most cases. However, if you want to
record more than one channel in a single TS file, or several audio
streams plus videotext, it takes special measures. There are three
ways to preset a special channel selection:
Change
the default selection by using the „+Videotext“
or „+Additional Audio“ checkboxes. This will
affect all subsequent recordings, though, unless you change
the setting again.
Use
a „frozen“ selection by ticking the „Keep
Selection“ checkbox as described above, in order to
prevent the default selection when the channel is tuned. In most
cases this is only suitable for a single scheduled recording. So it
is recommendable to additionally tick the „Only Next
Recording“ checkbox, in order to prevent subsequent
recordings from using an inapplicable selection.
(Ab)use
the description resp. title assigned to scheduled recording for
telling the Videorecorder Plugin which channels you want, by
entering a kind of „command line“. The first three
letters must be the identifier „VRP“, followed by the
channel name(s), separated by commas, if you specify more than one
channel.
If you want to use this method, please
take the following into account:
This kind of selection overrides any other selection, even a
„frozen“ selection on the Channels Tab. The different
kinds of program selection for scheduled recordings have the
following priority:
Channels specified in the line „Description“
with „VRP...“ have the highest priority.
If no channels are specified in this way, the
Videorecorder Plugin uses a „frozen“ selection („Keep
Selection“ is ticked).
If
„Keep Selection“ is not ticked, the plugin
selects the channel for which the recording has been scheduled in
the DVBViewer.
If the first three letters of the title are „VRP“, the
Videorecorder Plugin will execute the recording in any case,
regardless of other settings.
The channel names must be written exactly in the same way as
they appear on the Videorecorder Plugin's Channels Tab (not the
DVBViewer's channel list!).
Alternatively you may replace the channel names by the according
Service IDs (SIDs), as they are displayed on the Edit Tab of the
DVBViewer's Channelist Window. Or, if you want a specific audio
channel to be recorded, by a number composed of Service-ID + 65536 x
Audio-PID.
If you specify more than one channel, the Videorecorder Plugin will
record them as transport stream (TS), regardless of the selected
format.
As this method is equivalent to ticking channels on the ChannelsTab,
the Videorecorder Plugin will apply the default selection for the
contained elements. Use the „+ Videotext“ or „+
Additional Audio“ checkbox if you want to include videotext or
more than one audio stream in a TS recording.
If you specify no channel after „VRP“, the Videorecorder
Plugin maintains the current channel- resp. PID selection.
You have to take care that the channel for which the recording is
scheduled in the DVBViewer and the „command line“
channel(s) are broadcasted on the same transponder (frequency). The
Videorecorder Plugin has no opportunity to issue a warning
beforehand if they don't.
contents |
to the top | preceding
chapter | next chapter
PID Dump / Transponder
Recording
Clicking the „PID Dump“ button
switches the Channels Tab to the PID Dump view. It enables listing
all PIDs (Packet Identifiers) that are used on the current
transponder, as well as recording an arbitrary selection of the
corresponding data as TS file. Thus it is possible to access DVB
streams that no scanner will find. This feature has to be handled
with care, though:
It is only possible to display/record all
streams of a transponder if the DVB device provides them. Usually
this applies to all devices with BDA driver. However, there are
devices with a hardware filter that only lets the required streams
pass through. In this case you will only see the streams that are
currently used by DVBViewer.
Particularly the TechniSat SkyStar2 /
AirStar2, CableStar cards use
hardware filtering. They can be configured for receiving the whole
transponder, however. Go to „Settings / Options/ Hardware“,
select the card and tick the „Open whole transponder“
checkbox. Since this is not the standard mode, heavy dropouts in the
incoming data stream may occur in certain cases, particularly when
tuning satellite transponders with very high data rates that
overstrain the SkyStar2 capabilities.
As long as the PID Dump View is
active, starting a recording manually will let the
Videorecorder Plugin write the transport stream of the whole
transponder (resp. a selection) to your hard disk. Reckon on
considerable data rates. A typical transponder on Astra 19° East
delivers 35 Mbit/s. That are 4.2 MB per second resp. 14.7 GB per
hour. However, scheduled recordings always use the PID selection of
the normal Channels View, even if it is not active.
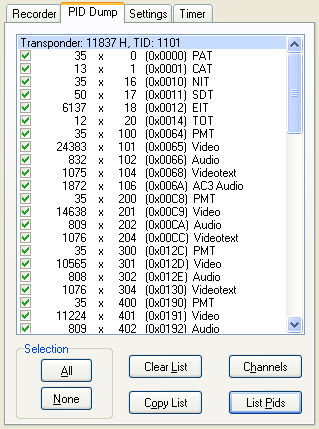 The
headline of the list box displays the transponder's frequency (plus
the polarisation in case of DVB-S) and the unique transport stream ID
(TID), that is retrieved from the DVBViewer's channel list, though it
is not exposed there.
The
headline of the list box displays the transponder's frequency (plus
the polarisation in case of DVB-S) and the unique transport stream ID
(TID), that is retrieved from the DVBViewer's channel list, though it
is not exposed there.
The PID Dump View provides the following
possibilities:
List PIDs: Starts the PID dump. Simultaneously the
Videorecorder Plugin starts counting the number of packets for each
PID that have been received, thus allowing to estimate the data rate
– each packet contains 188 bytes. Additionally the list
dipslays the PIDs as hexadecimal values in brackets, and the stream
type, if it can be detected.
A question mark indicates that the stream type
cannot be detected, a dollar sign ($) indicates an encrypted stream.
A „Private 1“ stream mostly contains AC3 audio or
videotext. In this case the Videorecorder Plugin couldn't determine
the content precisely. You can obtain more specific information by
recording the transponder and opening the file with the TSPlayer (see
below).
Stop PIDs stops the PID dump. After that you may untick /
tick the checkboxes on the left side in order to select streams for
a recording.
All and None select resp. deselect all streams.
Clear List clears the list and selects all PIDs for
recording.
Copy List copies the list as text to the Windows clipboard,
enabling you to insert it in a text editor. Furthermore the
Videorecorder Plugin writes the list to a recording's log file, if
the „Settings / Write Log File“
checkbox is ticked.
Channels switches back to the Channels View.
Clicking the „Start“ button
starts the recording of the transponder or your selection. Scheduled
recordings of a whole transponder can be accomplished by entering the
three letters „TSD“ („Transport Stream Dump“)
in the Title Input Line of the DVBViewer GE Scheduler Window. Please
pay attention to the required disk space!
You can open a whole transponder
recording with the TSPlayer, play the contained video, audio and
videotext streams, and extract and convert them. However, in some
cases the TSPlayer's default search depth may not be sufficient to
detect all streams in such a file. If expected streams are missing,
increase the „Search Depth“ value on the TPlayer's
Settings Tab, and the re-open the file.
contents |
to the top | preceding
chapter | next chapter