contents | to the top | to the bottom | previous chapter | next chapter
The DVBViewer Pro offers multiple possibilities for changing the appearance and adjusting the functionality.
 Language: Here you can select the language of the user interface.
Skin: You can set different skins for the DVBViewer.
Icon style: You can choose different the icon-styles for the DVBViewer toolbar:
Prevent Screensaver: Prevents all screen saver activities and switching to the stand by mode while the DVBViewer is running.
Hide the mouse cursor in fullscreen mode: Renders the mouse cursor invisible in fullscreen mode after the given time.
On top also in fullscreen. Disabled, all windows and menu bars will be in the background, thus you can only see the TV picture.
Start in fullscreen mode: The DVBViewer opens in fullscreen mode, not window mode.
Controlbar popup delay in ms: Here you can set a delay for the controlbar popup, that means when you move the mouse-pointer to the bottom of the display area the controlbar will not pop up at once but after the set delay.
Show DVBViewer in: Determines how Windows handles the running DVBViewer. It can be shown in the taskbar, in the system tray, or in both. In general System Tray only is recommendable, in order to save space in the taskbar, and to enable the context menu via right-clicking the DVBViewer tray icon.
HTPC-Mode changes the behaviour of the DVBViewer. Window mode is the standard setting for normal mouse control, HTPC mode starts in full-screen/OSD mode and requires a remote control.
Automatic Timezone automatically adjusts summer and winter time.
Synchronize by transponder uses the transponder information for synchronization.
contents | to the top | to the bottom | previous chapter | next chapter
Priority: Here you can set the priority for the DVBViewer's process in the system. To avoid problems it should at least be set to higher than normal, otherwise you may encounter lost frames in your recordings because of extensive CPU usage of other programs. But please note that especially highest priority may cause lost data, if you call time-consuming DVBViewer functions while recording (e.g. importing a channel list).
Use only first CPU enabled uses only one CPU in SMP/Hyperthreading environments. Since there may be issues with the TechniSat driver you should always enable this option.
Ignore error messages: Enabled, error messages are suppressed, which may occur when switching to an encrypted channel or one, that can't be received at all.
Support for visually impaired users (JAWS): When enabled the TV picture will be replaced by a textfield. When JAWS is installed this text and videotext will be read aloud.
Disable LNB on completion switches off the LNB when closing the DVBViewer.
Use Microsoft scheduler: When selected videorecorder programmings are sent to the scheduler for using standby or hibernation mode between recordings. For using this function you must download the Scheduler.exe from the Service Center and copy the file(s) to the DVBViewer's main folder.
contents | to the top | to the bottom | previous chapter | next chapter
Current Device : For normal TV-operation you need to select "Flexcop based cards". Further information about the network devices are located below. Skystar2 (compatible) supports 64-bit environments.
Video Output: Usually you should use the overlay mixer. Encountering problems, you may choose one of the others:
The following modes are supported:
Audio decoder and video decoder: Here you can select the audio and video decoder. You may try different decoders to compare the output quality or to avoid problems which are caused by a certain video/audio decoder. For example the Nero audio decoder is infamous for creating problems.
Detect Audio and video format automatically: You may try to change these two options in case of problems with either video or audio playback, for example problems with with non D1 broadcasts (for example 480 * 576, 544 * 576...) and Moonlight/Elecard decoders. Generally enabling these options increases the zapping delay since tuning takes a bit longer.
Use DVBSource for MPEG files: Uses a proprietary source- and demultiplexing filter so that there is no need for the inferior MS demultiplexing filter or 3rd party products. Should be enabled.
Post Processor lets you choose a special filter for enhancing the picture quality. Attention: This needs lots of CPU power.
Remember the Last Data Channel: This option should be enabled if you access the internet via satellite. In this case the DVBViewer permanently remembers the data channel used for data transmission..
Use DeDynamic Directshow filter (if available): Enabled, the DVBViewer uses the dedynamic audio filter. This filter reduces the discrepancy between loud and quiet passages in movies (it adjusts the loudness). Thus quiet passages are more amplified than loud passages. The sliding control on the right determines the basic volume (this is not applied to recordings!).
Output device: Here you can select the output device for audio playback. Usually this is only of importance, if there is more than one sound card in your PC (e.g. one on the main board and an additional one). If you possess a single sound card, the options refer to different ways of accessing the device. Should be set to default DirectSound device.
DVD Options lets you select audio and video decoders for DVD playback. You can also set the default subtitle and audio language.
Mosaic Options: Here you can set a video decoder for the mosaic preview, the arrangement of the channels and some other settings concerning font and colour.
contents | to the top | to the bottom | previous chapter | next chapter
On this tabsheet the Teletext and EPG options are located.
Do not receive EPG-data: Processing the EPG data can be very time-consuming on some channels. If this causes problems in conjunction with a slow CPU, the display may become jerky or the sound may get distorted, processing the EPG data can be switched off by using this option, although no EPG will be available then.
Auto-popup Mini-EPG in seconds: Enabled, the DVBViewer automatically displays some EPG information about the current broadcast after tuning a channel. The input field on the right determines how many seconds the EPG info remains visible.
Persistent EPG data: Enabled, all collected EPG data is saved to the hard disk, when the DVBViewer is shut down (EPG.dat in the DVBViewer folder), so that the data is available after the next program start.
contents | to the top | to the bottom | previous chapter | next chapter
Hide display in radio mode. Enabled, the DVBViewer's display window shrinks when tuning a radio-channel, so that you will only see the menu, icon and status bar. The OSD can't be accessed while being in radio mode.
Channel switching delay: Enable and set a delay in milliseconds. This is pretty useful, if you are frequently using the Channel plus/minus function (via mouse or keyboard).
The delay enables switching several channels forward/backward without tuning them, while the channel names are displayed continuously in the DVBViewer-window.
Fast Channelswitch: Enabled, switching to another channel is performed much faster. However there are issues with certain MPEG2 decoders, for example Elecard. Particularly changes of the video resolution or audio mode (e.g. from stereo to a mono signal, and thus to a lower audio bit rate) sometimes lead to distortions (Mickey Mouse voices, the picture is compressed to 2/3 of the width). These can be fixed easily, however, by using Rebuild Graph in the view menu. If the Fast Channelswitch option is not checked, the graph will be automatically rebuilt when switching over to another channel.
Automatic channel data update dynamically updates the PIDs of the current channel, useful and necessary for certain regional broadcasts.
radio mode
Here you can modify the appearance of the Teletext window. The Teletext options appear after clicking the sub-tabsheet Teletext:
Maximize on Fullscreen: Enable for displaying the TV picture in fullscreen mode, the teletext is also displayed maximized.
Font: Here you can select the font, which is used for Teletext representation.Language: This adjustment should generally remain set to automatic. If the the teletext, however, is not displayed with the correct character set, it may be adjusted by selecting the language here.
Fixed Rendersize: Enabled, the DVBViewer creates the teletext as a picture (bitmap) with a fixed size, in order to reduce processor usage. In this case the picture is simply stretched to fit the window, instead of being recalculated. Thus for the standard size of the teletext window, the number of pixels should be set horizontal/vertically to 470 x 444, in order to get a well readable representation. It is not advised to use this option.
colours: The lower area of the teletext options allows for defining the colour set. First select the colour you want to modify in the list on the left (colour 0..7). Then choose the new colour in the field in the middle. Alternatively you may type the red/green/blue values of the new colour in the three input fields R, G, B. Click the Set button, in order to apply the new colours. The Restore colours button resets the colours to their default.
contents | to the top | to the bottom | previous chapter | next chapter
This tabsheet contains important specifications for video and audio recordings.
Directories/Recorder: Lets you set the folder to place the recordings by either entering the complete path or just clicking the folder symbol to open a window for a more convenient folder selection. By default the subfolder Capture in the DVBViewer-folder is used.
Directory/Time SHIFT: Same as above, but for the temporary time shift file. This file is deleted automatically when closing the DVBViewer.
Split Files after: Enabled, the DVBViewer splits the recording automatically in portions of a specified size in order to cope with the limitations of the FAT32 file system (particularly under Windows 98/ME) or to prepare the files for creating (S-)VCDs. Enter the desired maximum size in the field after xxx mbytes.
Recording format: The DVBViewer allows for recording in different file formats, which can be selected in this list:
Signal ongoing recordings in the video window: When enabled, a running recording is indicated by a flashing red point overlayed to the television picture (the indicator is not recorded!).
Create information file: Enable to create a small text file for a recording. It contains the EPG information for the recorded show.
Automatic TimeShift starts a timeshift recording automatically when tuning a channel.
2k DVD packets creates always 2048 bytes packets, or more precisely, lets the recorder align the data packets to 2048 byte borders by filling the remaining space with stuffing bytes. This may be suitable for stand-alone DVD players, but increases the file size.
Use Smart Buffer: Activated the A/V-data is buffered before being written to disk. The maximum buffer size is 10% of the available RAM.
dT before after: This options adds time in minutes to the entries in the recorder list when programming via the EPG. Often the EPG information is not 100 percent correct or special events delay the programmed broadcast. Of course you can correct the settings one by one in the recorder list but this is a global setting.
You can also set default actions for recordings (i. e. only tune a channel) and after recordings (shut down for example).
contents | to the top | to the bottom | previous chapter | next chapter
As mentioned above you can watch TV over a LAN (local area network). There are two streaming solutions:
Unicast Streaming and Multicast Streaming
1. TCP (Transmission Control Protocol), this is one of the main protocols in TCP/IP networks. Whereas the IP protocol deals only with packets, TCP enables two hosts to establish a connection and exchange streams of data. TCP guarantees delivery of data and also guarantees that packets will be delivered in the same order in which they were sent.)
2. UDP (User Datagram Protocol). UDP is designed for applications where you don't need to put sequences of datagrams together. It fits into the system much like TCP. There is a UDP header. The network software puts the UDP header on the front of your data, just as it would put a TCP header on the front of your data. Then UDP sends the data to IP, which adds the IP header, putting UDP's protocol number in the protocol field instead of TCP's protocol number. However UDP doesn't do as much as TCP does. It doesn't split data into multiple datagrams. It doesn't keep track of what it has sent so it can resend if necessary. About all that UDP provides is port numbers, so that several programs can use UDP at once.
There are some prerequisites: First, the DVBViewer must be installed both on the server and the client(s). Second, on each client an MPEG2 decoder must be installed. Third, your firewall must be set up correctly.
And, most important: A functioning network must be installed. Both the server and the client must be equipped with NICs (Network Interface Cards or onboard solutions). They must be connected with at least CAT5 cabling or W-LAN 802.11g.
Use the following settings for the Microsoft network:
Server:
The TV card connection: No protocol is necessary here. In case you want to assign a static IP to the SS2/AS2/CS2 you should use the following IP-address: 192.168.238.238, subnet-mask: 255.255.0.0.
The LAN connection: The following items must be installed: The client for Microsoft networks, the file and printer sharing for Microsoft networks (not necessarily, but without it a network is quite useless), and the TCP/IP internet protocol. Here you should use a static IP-address, for example: 192.170.0.1, subnet-mask: 255.255.0.0.
You can select the TV-card by clicking on the card-icon.
Streamtype: Select Unicast or Multicast. Multicast causes more network traffic. Unicast streaming should be used with W-LAN.
Interface: As interface you must select the network that connects the server with the client(s). Maybe you must select different values for TTL and buffer size, but that depends on your system.
IP-Subnet: You should use the default value.
Client:
When automatically obtaining the IP-address you can use the command "IPconfig.exe /all" (without quotation marks) in a DOS-box to determine the addresses. On both the server and the client you must set the same workgroup.
On the server you must only start the DVB Server and click on start. Then open the DVBViewer on the client. Now you can watch TV over LAN, you can switch all channels.
There is another way of streaming only the current channel without using the DVBServer. In the options - network dialogue you find an input mask similar to the DVBServer. Attention: This works just with the current channel, that means you cannot tune another channel on the client!
contents | to the top | to the bottom | previous chapter | next chapter
 You can assign every function of the DVBViewer to a key (keyboard or remote control). Additionally you may also choose the function of the mouse wheel.
Use WinLirc remote control support must be enabled for using a remote. Forum member “comp” has written a guide for using WinLIRC and Girder, although it's in German. A translation is still pending. Have a look here.
Keyboard: The left side of the list presents the available DVBViewer functions. The right side contains the assigned keys. In order to modify an assignment, double-click the desired entry, and then press a key or a combination of keys (e.g. [Ctrl]+[Q]).
To remove an assignment just assign the same key to the same function again.
Please note: Some combinations already used by Windows should not be used, since that may lead to problems, e.g. [Ctrl]+[Alt]+[Del].
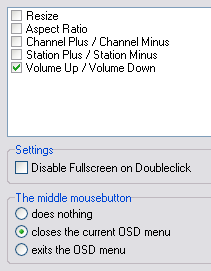
Mouse wheel: Here a list of functions is presented, which can be assigned to the mouse wheel.
WinLIRC: The WinLIRC sub-tabsheet presents a list, similar to the keyboard list. This list allows for assigning functions to the keys of a remote control, which is supported by the program WinLIRC. It is done exactly in the same way as for the keyboard, except one difference: You have to press a key of the remote control instead.
contents | to the top | to the bottom | previous chapter | next chapter