Due to the huge quantity of channels that can be received digitally via satellite, a simple conventional list gets quite unhandy. Therefore the DVBViewer offers the management in a hierarchical tree-like list, which is working similar to the file management on your hard disk. This section describes, how you can navigate in this list and modify it according to your needs. Additionally the channel search function is described.
contents | to the bottom | previous chapter | next chapter
Navigation in the Channel List
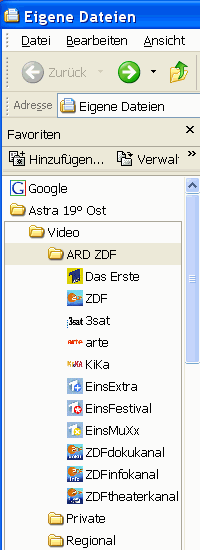
 The top level entry (the root folder) generally represents the satellite position (for example Astra 19° East), thus it is displayed as a satellite symbol. Each root contains two subfolders named video (for television channels) and audio (for radio channels). These subfolder again contain subfolders, representing the categories, in which finally the channels are sorted.
A folder may also be opened by clicking the plus sign located on the left of it. Clicking the minus sign of an already opened folder closes the complete subtree.
A simple mouselick selects the folder or channel for further operations such as delete or edit.
The keyboard allows for urther navigation possibilities:
The keys [¸], [¶], [Home], [End], [page ¸], [page ¶] are moving the selection up and down in different ways - just have a try.
Hitting the [return] key switches over to the selected channel.
The [-] key in the numerical pad closes the selected folder, the [+] key unfolds it. The [x] key in the numerical pad does even more: It opens the selected folder, all its subfolders and sub-subfolders... in order to diplay the whole content.
If you are looking for a certain channel, you may enter a search item in the Search input line. After hitting the [enter] key the next item containing the search item will be displayed and selected. You also may search for a channel with a certain number by entering the number in the right part of the Search input line.
contents | to the top | to the bottom | previous chapter | next chapter
You can alter the order of the channels, categories or roots. This can be easily done by drag and drop: Click the object you want to move, drag it to some other place and drop it there. Only the video/audio folders are not movable.
If you want to move a channel to another category or root, simply grab it with the mouse, and let it drop on the folder icon. If a channel is shifted to another root in this way, and its category does not yet exist there, it will be created. Category folders may also be moved to other roots.
If you prefer using the keyboard, you may move the entries as follows:
The [Shift]+[¸] and [Shift]+[¶] key moves the selected channel or category one position up or down.
The [Shift]+[Pos1 ] and [Shift]+[End] key move the selected object to the top or bottom position within its parent folder.
The [Del] key deletes the selected channel or folder after a warning query was raised. To improve the DVBViewer speed, it is recommended to remove all unused satellite folders (roots).
Please note: Accidentaly removed entries cannot be restored - there is no undo function. Therefore it is recommendable to create a backup copy of the file channels.dat. It is located in the DVBViewer folder and contains the entire channel list.
Furthermore you may rename roots, categories and channels. For this purpose click the object's name twice slowly - no ordinary double-click! After that, the name field turns into an input line, where the name can be edited in the usual way.
contents | to the top | to the bottom | previous chapter | next chapter
After having selected either a satellite position (root) or a channel, you can go to the Edit tabsheet. If it concerns a root entry, the following settings appear:
Name: In this input field you may modify the root folder name. Finish by clicking the Apply button
DiSEqC: The Digital Satellite Equipment control is a digital impulse, used for sending signals to the multiswitch. It is used in particular to switch between several satellite positions (for example Astra and Eutelsat). In this list you can determine the DiSEqC adjustment for all channels located in the root folder. Finish by clicking Apply. Important: If your satellite reception system is equipped with such a DiSEqC switch, the DiSEqC adjustment is a must! Without it, you probably can't receive anything. You may use an already available digital satellite receiver, in order to check, which DiSEqC adjustment is suitable for which satellite position.
 Delete: Deletes after a safety query the selected folder with its whole content. Is is recommendable to remove all unnecessary satellite positions from the standard channel list to improve the processing speed. Please note: There is no way to undo it. Once deleted, the entries are gone. So it is a good idea to create a backup copy of the file channels.dat. It is located in the DVBViewer folder and contains the entire channel list.
After having selected a channel, the Edit tabsheet shows a couple of settings. The three buttons at the bottom of the tabsheet have the following meaning:
Add: An additional channel with the displayed properties is inserted into the list. The original channel is preserved unchanged with its characteristics. In this way you may create a copy of a channel in another category, for example.
Remove: The channel is deleted from the list after a safety query.
The upper three fields determine, how and where the channel appears in the channel list.
Name: Here you may rename the channel. But be carefull: If there is a pending timer recording for this channel, it will not work anymore, because the DVBViewer cannot find the channel under its new name! Even if the channel is stored in the favourite list (see channel menu), it must be stored again with its new name, otherwise it cannot be tuned.
Root and category: Here you may assign the channel to another root or category. If the name entered by you does not yet exist, an new folder will be created accordingly.
In this way you can create new roots and/or categories easily.
Clicking the card icon lets you select the type of reception (satellite, cable, terrestrial and ATSC).
The checkboxes in the middle section have the following meaning:
Encrypted: Here you will find a checkmark, if the channel found by a channel scan is encrypted. Since the DVBViewer does not support the playback of encrypted channels, this adjustment has no meaning.
AC3: In order to receive a channel with AC3 sound the AC3 box must be checked. Additionally a corresponding AC3 audio PID must be entered. Actually only Pro7 broadcasts in AC3 (audio PID 257). AC3 reception is only possible with the SkyAVC (Marfi's) source-filter.
Exclude from the EPG: A checkmark here excludes an unwanted channel from the time-specific EPG (which shows all transmissions running at a point in time). Thus the EPG representation can be limited to a meaningful measure.
If a new channel is announced in the DVBViewer forum, the required data will also be listed. After entering the values and clicking on Add the new channel is available in your list. Here a few short notes explaining the meaning:
Frequency: The frequency of the data stream, in which the channel (together with other channels) is encoded.
Symbol rate: Indicates the amount of data, that is transferred per second in the data stream.
Polarization: The orientation of the electromagnetic waves received from the satellite, which can be distinguished by the LNB (the unit that receives the beam focussed by the dish). By using horizontal and vertical polarization more channels can be fitted into a frequency range. The receiver must indicate the desired polarization to the LNB by supplying it with a certain voltage (14/18 V), so it can align to it.
FEC: Type and extent of the Forward Error Correction in the data stream.
PID: The Program Identifier is required to filter the correct packages out of the data stream. Uncorrect PIDs may cause different problems (Missing video/audio, error messages).
LNB-Selection: This is a signal frequency, sent by the receiver to the LNB, in order to select a certain frequency range. There is a Low Band, which is normally used for analog transmissions (but more and more gets occupied by digital streams), and also a High Band assigned for digital transmission. The correct adjustment for Low Band channels (below 11700 MHz) is None. For High Band channels (above 11700 MHz) 22 kHz is appropriate.
LNB frequency: The frequencies sent by the satellite are that high, that they cannot be transported by cables. Therefore the LNB creates its own high frequency signal, which is used to "mix down" the satellite signal to a frequency suitable for cable. A LNB frequency of 9750 MHz is appropriate for Low Band channels, 10600 MHz for High Band channels (see paragraph above).
contents | to the top | to the bottom | previous chapter | next chapter
Several broadcasters are transmitting two or more audio channels, in order to provide two or more languages, e.g. Motors TV (English/French). Pro7 uses a second audio channel for AC3 Surround sound. Which audio channel is played back by DVBViewer, depends on the Audio PID displayed on the Edit tabsheet.
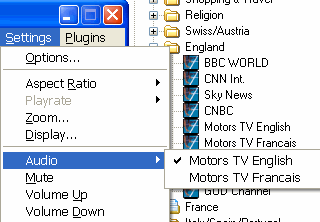 In order to enable an audio channel switching, the channel must be added in the channel list several times with different Audio PIDs. Each time a new TV channel is tuned in, the DVBViewer checks automatically if the channel is represented with more than one available Audio PID in the list. If it is, you will find an Audio entry in the Settings Menu. It activates a submenu, where you may select the different audio channels.
The menu entries in the picture on the right can be achieved as follows:
Select Motors TV in the England category. Go to the Edit tabsheet, rename the channel to Motors TV English and click on Update.
contents | to the top | to the bottom | previous chapter | next chapter
 Instead of adding a lot of new channels manually on the Edit tabsheet, you may prefer to let the DVBViewer do the job by performing a channel scan. That means, the DVBViewer searches for channels within a certain frequency range. All relevant data are determined by the program and entered in the channel list. Just switch to the Channel Scan tabsheet and follow the step by step instruction:
First of all, you have to enter a name for the Root folder, in order to determine where the found channels are stored. If you give it a name, which does not yet exist, a new root folder for the scan results will be created. This is recommendable - probably you will get a lot of unwanted channels. Just move the wanted results to your favourite folder, and delete the whole root folder temporarily used for scanning afterwards to get rid of the rest.
An even better alternative: Select the desired satellite position from a list, which can be opened via the triangle symbol located on the right of the edit field. The list entries stand for prefabricated transponder lists, which enable the DVBViewer to scan much faster and more accurate. The transponder lists are located in the DVBViewer/Transponders folder as INI files (e.g. 0192,ini stands for Astra 19° East) and may be updated by downloading them from http://joshyfun.topcities.com/transponders/
The LOF adjustments (Local Oscillator Frequency, LNB frequency) should be left unchanged; unless you know what you do.
DiSEqC must be adjusted only if your equipment is able to receive several satellite positions (for example Astra and Eutelsat®). Also the symbol rates preset for the search are usually sufficient.
The Start- and End Frequency determine the frequency range to be scanned. Scanning the whole preset range takes some minutes, if a transponder list is used, and up to an hour without transponder list. Thus it is often more effective to scan only a small range in which new channels are suspected (e.g. one transponder with the same value for start and end frequency).
The Stepsize only plays a role, if you do not use the prefabricated transponder list. In this case the stepsize is used to increment the scanned frequency. The higher the value, the faster the search, and the higher the probability that couple of channels are not found.
If you enable the Scan & Update option, the DVBViewer updates already existing channels, if (and only if) they own the same DiSEqC, Service-PID and Audio-PID value as the scanned channel. If no matching channel is found in the list, the scanned channel wil be added as a new entry.
The Sort by Provider and Sort by Frequency radio buttons determine, whether the category folders for the scanned channels are created and named according to their provider (e.g. MTV® Networks) or their frequency and polarization (e.g. 11739 V).
If you enable the Free To Air only option, only channels that are not encrypted are added to the list. Please note: This option may also be used as a filter for importing channel list (see section below). It's a very useful option because the DVBViewer does not and will not support decryption in any form.
contents | to the top | to the bottom | previous chapter | next chapter
When the DVBViewer is closed, it stores the channel list in the file channels.dat, whereby it uses its own format. There are however also different formats, which can be imported or exported by clicking the two buttons at the bottom of the channel list window. They open a window for file selection. Use the dropdown list at the bottom of the window to select the desired file type resp. Format:
MDB: Microsoft Acess® Database - a Microsoft® data base format that can be imported.
SDX: Channel lists in the SatcoDX format, that can be imported. You find them at http://www.setedit.de/satco_sdx_de.html. These lists are quite up-to-date, but contain no teletext PID. Thus the Teletext of the imported channels won't work, unless the PIDs are supplemented manually.
TXT: Text file program lists by TechniSat. These files can be retrieved from http://www.technisat.com/. As this format doesn't contain the teletext PIDs, they must be supplemented manually.
INI: A format that can be imported and exported by the DVBViewer, and furthermore processed with a text editor.Is is the prefered format for channel list interchange. A constantly updated channel list for Astra 19° east can be downloaded as INI file from http://www.dvbviewer.com/download/astrafta.zip.
The import function inserts the channels into the list, as if they would have beeen added manually on the Edit tabsheet.
If the present program list is to be replaced by a new imported list, it can be deleted entirely by clicking the button Clear All. After a safety query the channel will be completely empty. Caution: This cannot be undone.
contents | to the top | to the bottom | previous chapter | next chapter
From release 1.98 R17 the DVBViewer provides the ability to create shortcuts of the most used channels in various places - on the Desktop, in the Start Menu, within an Explorer window or in the Internet Explorer Favourites.
The selection of channels is done by (double-) clicking the shortcut. In case the DVBViewer is not running yet, it will be started and the selected channel will be played. Should the DVBViewer already be active, it will change to the selected channel.
 The external channel selection depends on the DVBViewer command line parameters, listed here:
-c DVBViewer shows no channel at first (standby)
-cNumber: Switches to the given channel number.
Example: c:\ program files\DVBViewer\DVBViewer.exe -c12
-cName: Switches to the channel with the given name.
Example: c:\ program files\DVBViewer\DVBViewer.exe -cMTV Central
-c:Service-PID: Switches to the channel with the given Service-PID.
Example: c:\ program files \DVBViewer\DVBViewer.exe -c:28653
Example: c:\ program files\DVBViewer\DVBViewer.exe -cMTV Central:28653
Always the first channel in the list of channels, which matches the parameter, will be selected. However, with the last option, channels with a recurring name can be selected definitely. The Service PID of a channel can be found in the Channel Window of the DVBViewer, on the Edit tab. Please note that after deleting, inserting or re-arranging channels in DVBViewer, it is possible that a different channel will be selected when using the option to select by channel number.
To manually create a channel shortcut, follow these steps:
Drag the icon of DVBViewer.exe with the right mouse button and drop it on to the desktop (or anywhere else) and select "Create shortcut(s) here" from the menu. Should a shortcut to DVBViewer already exist on the Desktop, you can select it as well with the right mouse button and move it to the desired place and select "Copy here" in the context menu.
Right-click the shortcut with the mouse and choose Properties in the emerging context menu and select the tab Shortcut.
Append one of the aforementioned parameters in the field Target to the DVBViewer path and program filename. The program file-name and the parameter must be separated by a blank. The field then should contain something like: c:\Program files\DVBViewer\DVBViewer.exe -c CNN
On the tab General you can now assign a descriptive name - for instance the channel name - to the shortcut. Finish that by clicking "OK".
Double-clicking the shortcut will now switch to the respective channel. To facilitate the creation of external channel lists you can use the downloadable Tool package. It contains a
aReadme file with step-by-step-instructions for creating external channel lists,
a VBScript tool, that automatically creates channel shortcuts out of a channel list exported as INI-file,
a VBScript tool, that facilitates assigning individual icons to the channel shortcuts and