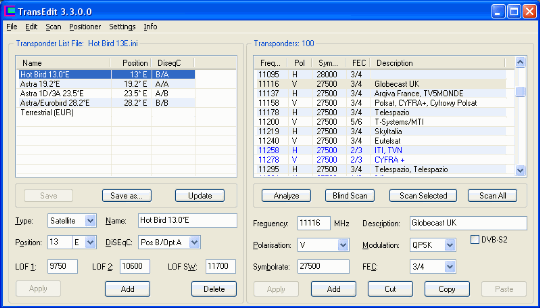
The left side of the TransEdit Main Window displays all transponder list files that have been loaded, the right side all transponders that are contained in the selected file. In both lists you can add, change or delete entries and sort them in different ways.
File Commands | Transponder List Properties | Edit Commands | Transponder Properties | Scan Commands | Blind Scan | Up-To-Date Transponder Lists
The following commands refer to transponder lists. They are stored as text files with the extension .ini. When launched, TransEdit automatically loads all transponder list files that are present in the sub-directory Transponders of the DVBViewer configuration folder (you may inspect its content with „Info/ Configuration Folder“). If TransEdit is not located in the DVBViewer installation directory (containing DVBViewer.exe), it will automatically load all transponder list files that are present in its own directory or in a sub-directory Transponders.
The file menu allows to open, save and delete transponderlist files listed on the left side. TransEdit displays the filename of the selected entry at the top of the list view. The file commands are also available in a context menu. Open it by right-clicking the list on the left. The transponder lists can be sorted in different ways by clicking the according column title. Clicking it again reverses the sort order. A marker indicates by which column and in which direction (ascending / descending) the list is sorted. You may also change the column width by dragging the line at the border between the column titles with the mouse
![]() Open: Opens a dialog window for selecting and adding a
transponder list (INI) file to the main window. You may also open
the file by dragging and dropping it on the TransEdit icon or the
Main Window. Doing the same with a folder performs „Close
All“ (see below) and opens all (valid) transponder list
INI files that are present in the folder.
Open: Opens a dialog window for selecting and adding a
transponder list (INI) file to the main window. You may also open
the file by dragging and dropping it on the TransEdit icon or the
Main Window. Doing the same with a folder performs „Close
All“ (see below) and opens all (valid) transponder list
INI files that are present in the folder.
If the selected resp. dragged &
dropped INI file does not contain a transponder list, but a channel
list exported by TransEdit or DVBViewer, it is displayed in a
Scanner Window „as if
scanned”. The re-import allows to rework channel lists by
filtering and sorting them in a different way. All functions of the
Scanner Window are available except "Dead
Channels" and
"Analyze".
Please
note: TransEdit
reads the tuner type and (in case of satellite) the orbital position
of the first entry and - for consistency - subsequently only imports
channels with the same tuner type and orbital position. Others are
discarded.
![]() Close: Saves the data of the selected transponder list to the
corresponding INI file, if there were any changes, and removes it
from the main window. If no filename has been assigned to the
transponder list yet (e. g. after creating a new list via the „New“
command), a window pops up, prompting you to enter a filename.
Close: Saves the data of the selected transponder list to the
corresponding INI file, if there were any changes, and removes it
from the main window. If no filename has been assigned to the
transponder list yet (e. g. after creating a new list via the „New“
command), a window pops up, prompting you to enter a filename.
![]() Close All: Saves all transponder lists, that have been
changed, and clears the main window.
Close All: Saves all transponder lists, that have been
changed, and clears the main window.
![]() Undo / Reload: Cancels all changes by reloading the
transponder list from the corresponding file.
Undo / Reload: Cancels all changes by reloading the
transponder list from the corresponding file.
![]() Save: Saves the data of the selected transponder list to the
corresponding INI file, if there were any changes.
Save: Saves the data of the selected transponder list to the
corresponding INI file, if there were any changes.
![]() Save as...: Saves the data of the selected transponder list
to a (new) INI file. A dialog window pops up, prompting you to enter
a filename.
Save as...: Saves the data of the selected transponder list
to a (new) INI file. A dialog window pops up, prompting you to enter
a filename.
![]() Save all: Automatically saves the data of all transponder
lists, that have been changed, to the corresponding files.
Save all: Automatically saves the data of all transponder
lists, that have been changed, to the corresponding files.
Entries that have been changed (e. g. by
adding a new transponder) are displayed in red,
marking them as not yet saved. After saving a list changes applied to
it are final. The Undo/Reload function (see above) discards all
changes.
![]() New List: Creates a new transponder list. Select the desired
type in the submenu (satellite, cable, terrestrial, ATSC, DVB IPTV).
The new list is initially empty.
New List: Creates a new transponder list. Select the desired
type in the submenu (satellite, cable, terrestrial, ATSC, DVB IPTV).
The new list is initially empty.
The buttons at the lower left can be used to add and delete transponder lists, or to change their properties:
![]() Apply changes the properties of the selected transponder list
by assigning the displayed values to it (see next section).
Apply changes the properties of the selected transponder list
by assigning the displayed values to it (see next section).
![]() Add adds a new transponder list with the properties that you
have entered. A new list initially is empty and contains no
transponders.
Add adds a new transponder list with the properties that you
have entered. A new list initially is empty and contains no
transponders.
![]() Delete removes the selected transponder list. TransEdit does
not delete the corresponding file, but renames it from *.ini to
*.del. Thus the transponder list will not appear in TransEdit or
DVBViewer anymore, unless you use the Windows Explorer to rename the
file back to *.ini.
Delete removes the selected transponder list. TransEdit does
not delete the corresponding file, but renames it from *.ini to
*.del. Thus the transponder list will not appear in TransEdit or
DVBViewer anymore, unless you use the Windows Explorer to rename the
file back to *.ini.
![]() Set Group is only available in the context menu that appears
after right-clicking one of the transponder list entries on the
left. A sub-menu allows to assign one of the groups A...H to the
selected transponder list.
Set Group is only available in the context menu that appears
after right-clicking one of the transponder list entries on the
left. A sub-menu allows to assign one of the groups A...H to the
selected transponder list.
The groups correspond to the channel
groups in DVBViewer. They enable assigning transponder lists (or even
single channels in DVBViewer) to particular devices. If you set a
transponder list to group B, TransEdit will only use devices
containing group B in their channel group set (see „Settings/
Hardware“) for scanning/analyzing transponders from
this list E.g. if one of your devices is connected to a dish pointing
to Astra, and another one to a second dish pointing to Hotbird, you
can tell TransEdit by setting the groups accordingly which device
must be used for which satellite position. TransEdit uses the group
setting of a transponder list as default resp. preset for the Group
Drop-down List in the Scanner Window. It determines which group
is assigned to exported scan results.
contents | to the top | preceding chapter | next chapter
The lower left part of the main window displays the properties of the currently selected transponder list. They apply to all contained transponders.
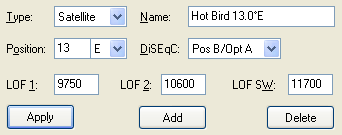
Which transponder list properties are displayed in the input area depends on the type of the transponder list.
![]() Name: The internal name of the transponder list, that is
stored in the INI file (e. g. the name of the satellite position).
It also appears in the drop-down list when selecting a transponder
list for scanning in DVBViewer.
Name: The internal name of the transponder list, that is
stored in the INI file (e. g. the name of the satellite position).
It also appears in the drop-down list when selecting a transponder
list for scanning in DVBViewer.
![]() Type: The type of the transponder list (satellite, cable,
terrestrial, ATSC or DVB IPTV).
Type: The type of the transponder list (satellite, cable,
terrestrial, ATSC or DVB IPTV).
![]() Position (satellite only): The orbital position of the
satellite in degrees, plus „E“ for East or „W“
for West. This value does not affect scanning - it's just a commonly
used satellite attribute.
Position (satellite only): The orbital position of the
satellite in degrees, plus „E“ for East or „W“
for West. This value does not affect scanning - it's just a commonly
used satellite attribute.
![]() LOF 1, LOF 2, LOF SW (satellite only): The first two values
are the Local Oscillator Frequencies (in MHz) of your LNB for
receiving the low and high band. LOF SW (LOF Switch) marks the
border between low and high band. TransEdit assumes that LOF 1
applies to all frequencies below LOF SW (22 kHz Tone switched off) ,
and LOF 2 to all frequencies above LOF SW (22 kHz Tone switched on).
LOF 1, LOF 2, LOF SW (satellite only): The first two values
are the Local Oscillator Frequencies (in MHz) of your LNB for
receiving the low and high band. LOF SW (LOF Switch) marks the
border between low and high band. TransEdit assumes that LOF 1
applies to all frequencies below LOF SW (22 kHz Tone switched off) ,
and LOF 2 to all frequencies above LOF SW (22 kHz Tone switched on).
The default values (9750/10600/11700) are
appropriate for the commonly used Universal LNBs, that are able to
receive two frequency bands (low and high, controlled by the 22 kHz
tone). Do not change the values, unless you know exactly what you do.
If your LNB does not belong to the „Universal“ type, set LOF SW to 0, and enter the appropriate Local Oscillator Frequency either as LOF 1, if you want the 22 kHz tone to be switched off, or as LOF 2, if the 22 kHz tone shall be switched on. The other (unused) LOF must be set to 0. This enables using a 22 kHz switch for selecting a satellite position.
![]() DiSEqC (satellite only): The Digital Satellite Equipment
Control signal switches between different satellite positions.
DiSEqC is important, if your equipment allows to receive more than
one satellite position (e.g. Astra/Hotbird). Please read more about
it in the DiSEqC Settings chapter.
DiSEqC (satellite only): The Digital Satellite Equipment
Control signal switches between different satellite positions.
DiSEqC is important, if your equipment allows to receive more than
one satellite position (e.g. Astra/Hotbird). Please read more about
it in the DiSEqC Settings chapter.
DVBViewer Pro automatically adopts the
LOF and DiSEqC settings if you select the transponder list under
„Channel / Channel Editor / Scan“, so that you
don't have to enter the values manually. But please have in mind that
downloaded transponder lists usually do not contain these values.
It's a non-standard TransEdit/DVBViewer feature.
contents | to the top | preceding chapter | next chapter
The following commands refer to the transponders of the selected transponder list. They affect the list that is displayed on the right and allow to add and delete transponders, change their properties or to move them to another list. For multi-selection, keep the Ctrl or Shift key pressed while clicking entries. The transponders can be sorted in different ways by clicking the according column title. Clicking it again reverses the sort order. A marker indicates by which column and in which direction (ascending / descending) the list is sorted. You may also change the column width by dragging the line at the border between the column titles with the mouse
![]() Cut: Moves the selected transponders to the clipboard and
deletes them from the list.
Cut: Moves the selected transponders to the clipboard and
deletes them from the list.
![]() Copy: Moves the selected transponders to the clipboard
without deleting them.
Copy: Moves the selected transponders to the clipboard
without deleting them.
![]() Paste: Inserts the clipboard's content in the transponder
list.
Paste: Inserts the clipboard's content in the transponder
list.
TransEdit uses its own internal clipboard
to store transponders, not the Windows clipboard. The program
prevents moving transponders to a list of different type (e. g. from
satellite to terrestrial), but not moving them from a Hotbird to an
Astra list, which also would make no sense.
![]() Select all: Selects all transponders in the list.
Select all: Selects all transponders in the list.
![]() Delete: Deletes the selected transponders from list, without
moving them to the clipboard.
Delete: Deletes the selected transponders from list, without
moving them to the clipboard.
![]() Delete [X]-marked: Deletes all transponders that contain an
[X] mark at the beginning of their description. TransEdit optionally
inserts the [X] mark if transponders deliver no signal or no scan
results (see Settings/
Scanner).
Delete [X]-marked: Deletes all transponders that contain an
[X] mark at the beginning of their description. TransEdit optionally
inserts the [X] mark if transponders deliver no signal or no scan
results (see Settings/
Scanner).
![]() Clear: Deletes all transponders in the list.
Clear: Deletes all transponders in the list.
Additionally there are two buttons for changing a transponder's properties and for adding new transponders:
![]() Apply: Changes the properties of the selected transponder by
assigning the entered values to it (see next section).
Apply: Changes the properties of the selected transponder by
assigning the entered values to it (see next section).
![]() Add: Adds a new transponder to the list, with the properties
that you have entered.
Add: Adds a new transponder to the list, with the properties
that you have entered.
Additionally the most important edit and
scan commands are available in a context menu. Open it by
right-clicking the list of transponders on the right.
contents | to the top | preceding chapter | next chapter
The input area at the lower right allows to change the properties of a transponder.
![]()
Which transponder properties are displayed in the input area depends on the type of the selected transponder list:
![]() DVB-S (satellite):
DVB-S (satellite):
Frequency
Polarization
Symbolrate
FEC (Forward Error Correction)
Description
Modulation (QPSK, 8PSK, 16 QAM) and Modulation System (DVB-S / DVB-S2)
Pilot Symbols and Roll-Off (only relevant for DVB-S2 and Hauppauge/FireDTV DVB-S2 devices)
FEC (Forward Error Correction) determines the degree of automatic error correction provided in the DVB data stream. „Auto“ lets your card detect the FEC automatically, if it provides such capabilities. However, scanning „difficult“ transponders may work better with a correct preset value. If you want TransEdit to scan with Auto FEC Detection, independently from the transponder list entries, you may tick the „Always Scan With FEC Auto Detection“ checkbox in the Settings Window.
For receiving DVB-S2 transponders
the modulation system of the transponders must be set correctly to
„DVB-S2“. In the list they are displayed in blue.
Additionally a DVB-S2 device is required, and it must be marked as
„DVB-S2 Device“ under Settings/
Hardware. Otherwise attempting to scan a single DVB-S2
transponder will cause an error message, or TransEdit will skip the
DVB-S2 transponders in case of a selection containing a S/S2 mixture.
All known devices are able to detect the modulation (QPSK, 8PSK) automatically, thus ignoring this setting, except Hauppauge and FireDTV DVB-S2 cards in case of DVB-S2 transponders. Additionally they require correct FEC and Pilot Symbols on/off settings in DVB-S2 mode. Roll-Off doesn't seem to have much influence, however.
![]() DVB-T (terrestrial):
DVB-T (terrestrial):
Frequency
Bandwidth
Description
![]() DVB-C (cabel):
DVB-C (cabel):
Frequency
Modulation
Symbolrate
Description
![]() DVB IPTV
DVB IPTV
IP Address
Port
Description
Descriptions make transponders more
recognizable. It is a non-standard feature of TransEdit, however.
Usually downloaded transponder lists will not contain descriptions.
If the according option in the Settings
Window is ticked, TransEdit automatically inserts the providers
of a transponder and/or the current date as transponder description,
while performing a channel scan.
contents | to the top | preceding chapter | next chapter
The Scan Commands open another window and access a DVB device. In case of „Scan Selected“, „Scan All“ and „Blind Scan“ TransEdit opens an additional Scanner Window for each tuner type and satellite position, so that results from different DVB networks don't get mixed up.
![]() Scan Selected: Scans the selected transponders and displays
the results in the Scanner Window.
Alternatively you may doubleclick a single transponder that you want
to scan.
Scan Selected: Scans the selected transponders and displays
the results in the Scanner Window.
Alternatively you may doubleclick a single transponder that you want
to scan.
![]() Scan all: Scans all transponders in the list and displays the
results in the Scanner Window.
Depending on the number of transponders, an overall scan may take
some minutes. The process can be stopped by clicking the Stop Button
in the Scanner Window or closing it
Scan all: Scans all transponders in the list and displays the
results in the Scanner Window.
Depending on the number of transponders, an overall scan may take
some minutes. The process can be stopped by clicking the Stop Button
in the Scanner Window or closing it
While TransEdit is performing a scan you
may start another one for a different transponder list, provided
there is a suitable second tuner resp. DVB device. Each ongoing scan
requires a tuner on its own. If you have two DVB-S tuners, you can
scan scan Astra and Hotbird at the same time, for example.
![]() Blind Scan: Performs a scan without using the transponder
frequency and parameter presets (like symbol rate, modulation...)
that are listed on the right. The command opens the Blind Scan
Window. It enables specifying frequency and parameter ranges that
TransEdit shall examine „blindly“. This feature can be
useful if you have no matching transponder list for a DVB network,
or if there are unofficial „secret“ transponders (like
satellite feeds) that you would like to detect. More about it in the
next section (see below).
Blind Scan: Performs a scan without using the transponder
frequency and parameter presets (like symbol rate, modulation...)
that are listed on the right. The command opens the Blind Scan
Window. It enables specifying frequency and parameter ranges that
TransEdit shall examine „blindly“. This feature can be
useful if you have no matching transponder list for a DVB network,
or if there are unofficial „secret“ transponders (like
satellite feeds) that you would like to detect. More about it in the
next section (see below).
![]() Scan TS File: Opens a file dialog box and lets the Scanner
read its input from the selected TS file. This function is a debug
facility for pinpointing scanner problems with DVB networks /
transponders that the DVBViewer developers can't receive. It is not
possible to export the scan results since important parameters like
frequency, symbol rate etc. can't be retrieved from a file.
Scan TS File: Opens a file dialog box and lets the Scanner
read its input from the selected TS file. This function is a debug
facility for pinpointing scanner problems with DVB networks /
transponders that the DVBViewer developers can't receive. It is not
possible to export the scan results since important parameters like
frequency, symbol rate etc. can't be retrieved from a file.
![]() Update: Performs a special full scan in order to find changed
or additional transponders. TransEdit automatically updates the
list, if a transponder's properties have changed, and inserts new
ones. It is done by reading the NIT (Network Information Table) of
all transponders that are already in the list, and of course the NIT
of newly detected transponders. A NIT scan and transponder update
can also be performed while scanning for channels, if the according
option in the Settings Window
is ticked.
Update: Performs a special full scan in order to find changed
or additional transponders. TransEdit automatically updates the
list, if a transponder's properties have changed, and inserts new
ones. It is done by reading the NIT (Network Information Table) of
all transponders that are already in the list, and of course the NIT
of newly detected transponders. A NIT scan and transponder update
can also be performed while scanning for channels, if the according
option in the Settings Window
is ticked.
While performing a NIT scan TransEdit
displays the progress in the Scanner
Window. This kind of scan does not search for channels, however.
The success of a NIT scan depends on the broadcasters. On some
satellite positions (like Astra, Hotbird) there are transponders that
provide a reliable and fairly complete NIT. Having one of these
transponders in the list will result in a complete transponder list
after a NIT scan. On other satellite positions (or with DVB-T) the
result may be rather poor.
![]() Analyze: Opens the TS
Analyzer Window, that lists all streams that are available on
the selected transponder, and the complete content of all
broadcasted SI (Service Information) tables as treeview. If more
than one transponder is selected, TransEdit analyzes the first one.
Analyze: Opens the TS
Analyzer Window, that lists all streams that are available on
the selected transponder, and the complete content of all
broadcasted SI (Service Information) tables as treeview. If more
than one transponder is selected, TransEdit analyzes the first one.
![]() Analyze TS file: This command in the Scan Menu opens a file
dialog box, and after selecting a TS (Transport Stream) file the TS
Analyzer Window, that lists all streams and SI tables that are
contained in the file. Alternatively you may drag and drop the file
on the TransEdit Icon, the TransEdit Main Window or the Analyzer
Window, if already open. While a file is analyzed, you may
additionally open the Preview Window to view or hear contained
video/audio streams.
Analyze TS file: This command in the Scan Menu opens a file
dialog box, and after selecting a TS (Transport Stream) file the TS
Analyzer Window, that lists all streams and SI tables that are
contained in the file. Alternatively you may drag and drop the file
on the TransEdit Icon, the TransEdit Main Window or the Analyzer
Window, if already open. While a file is analyzed, you may
additionally open the Preview Window to view or hear contained
video/audio streams.
In case of a file the Analyzer uses a „File Device“, which is a software simulation of a DVB hardware device, thus reading the data as if it was broadcasted live. However, the original speed can only be achieved if time stamps are present in the file (PCR, Program Clock Reference). Most TS files with video and/or audio contain such a PCR. If it is missing, the Analyzer reads the file with the maximum speed of your hard disk, without being able to calculate and display data rates. If you want high speed processing anyway, tick the „Settings/ Analyzer/ High speed file analysis“ checkbox. It takes effect after selecting the next file, and does not prevent the Anaylzer from calculating data rates, if a PCR is present.
Before using a device TransEdit checks
whether it is already occupied by a running DVBViewer instance. If
yes, TransEdit first tries to find another equivalent device. If none
is available, TransEdit displays a message box. In case DVBViewer GE
is running, the message box gives you the opportunity to cancel the
action or to continue. Please note that continuing will
interrupt TV/radio reception and stop all ongoing recordings. In case
DVBViewer Pro is running, TransEdit will simply refuse to continue,
since the Pro version doesn't provide a „clean remote stop“.
Additionally the most important edit and
scan commands are available in a context menu. Open it by
right-clicking the list of transponders on the right.
contents | to the top | preceding chapter | next chapter
The Blind Scan Window enables specifying frequency and parameter ranges that TransEdit shall examine „blindly“, without using the frequency and parameter presets (like symbolrate, modulation...) of a transponder list. Please note: This is a feature for experienced users, because it requires some knowledge about the transponder parameters and the capabilities of your DVB device.
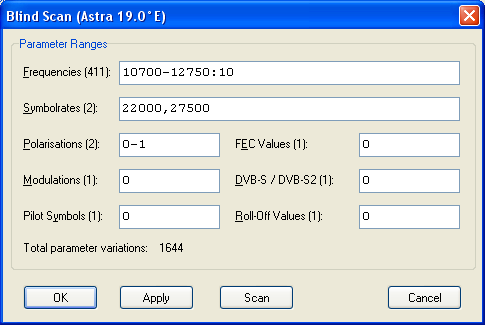
First have a look at the image above. It will give you an idea how it works. The Blind Scan Window lists all parameters that may be relevant for a DVB network type (satellite, terrestrial...), here as an example for satellite. For DVB-T or DVB-C there would be less parameters. The input – as shown - instructs TransEdit to try all frequencies from 10700 to 12750 MHz in 10 MHz steps, each one with two symbolrates and two polarizations (horizontal and vertical). Altogether 1644 parameter variations that have to be tried, which would take some time. The remaining parameter ranges are set to 0, which means „use the default value“ resp. „let the DVB device detect it“ (auto setting).
More precisely: Each input field allows to specify a list of parameter ranges, separated by commas. The syntax:
ParamRangeList = ParamRange1[,ParamRange2[,ParamRange3[,...]]]
ParamRange = StartValue[-EndValue[:StepSize]]
The values in squared brackets are optional. If no step size is specified, TransEdit uses a step size of 1. If no end value is specified, TransEdit assumes end value = start value, which means, it will try only one value. Another example: You want the the scanner to try 4000 as symbol rate, additionally all symbol rates from 5000 to 5500 in 10 ksym/s steps. The according input in the Symbolrates line would be
4000,5000-5500:10
All values must be specified numerically, particularly polarization, FEC, modulation etc. zero-based according to the drop down lists in the TransEdit Main Window. The first entry in the drop down lists corresponds to the value 0, the second to 1, and so on. In case of a checkbox (e.g. DVB-S2 ) 0 means „unticked“ and 1 „ticked“. If a device is able to detect a parameter automatically (e.g. the modulation), simply enter 0, which equals a parameter range of 0-0:1.
If a certain parameter combination turns out to be successful – which means, data comes in – TransEdit skips further parameter variations and continues with the next frequency. However, on some satellite positions there might exist two transponders on the same frequency, one with horizontal and one with vertical polarization. You can instruct TransEdit to take this into account by using a different way of specifying the polarization parameter range:
![]() 0-1 (as one parameter range) lets TransEdit skip „vertical“
(= 1), after „horizontal“ (= 0) has been successful.
0-1 (as one parameter range) lets TransEdit skip „vertical“
(= 1), after „horizontal“ (= 0) has been successful.
![]() 0,1 (as two parameter ranges) lets TransEdit try „vertical“
(= 1), even if „horizontal“ (= 0) has been successful
before.
0,1 (as two parameter ranges) lets TransEdit try „vertical“
(= 1), even if „horizontal“ (= 0) has been successful
before.
Modulation, Pilot Symbols and Roll-Off
are only relevant for a satellite blind scan if you want to detect
DVB-S2 transponders with a Hauppauge or FireDTV DVB-S2 device. The
blind scanner is particularly useful, if you come to know that there
is a DVB-S2 transponder on a certain frequency, but you have no clue
how these parameters must be set. Save some work - let TransEdit try
all variations. For DVB-S or other DVB-S2 cards set these parameters
to 0. The same applies to FEC – most DVB-S/S2 cards are able to
detect it automatically, except Hauppauge and FireDTV in DVB-S2 mode
(due to the Conexant chipset).
The buttons at the bottom do the following:
![]() Apply stores the parameter ranges in the transponder list, so
that you don't have to enter them again next time. Additionally
TransEdit recalculates the number of parameter variations, for each
parameter separately and the resulting total number (the product of
all single variations), which helps to estimate how much time the
complete blind scan will take.
Apply stores the parameter ranges in the transponder list, so
that you don't have to enter them again next time. Additionally
TransEdit recalculates the number of parameter variations, for each
parameter separately and the resulting total number (the product of
all single variations), which helps to estimate how much time the
complete blind scan will take.
![]() OK stores the parameter ranges in the transponder list and
closes the window.
OK stores the parameter ranges in the transponder list and
closes the window.
![]() Scan stores the parameter ranges in the transponder list,
closes the window, starts the blind scan and opens the Scanner
Window, that shows the progress and the found channels.
Scan stores the parameter ranges in the transponder list,
closes the window, starts the blind scan and opens the Scanner
Window, that shows the progress and the found channels.
TransEdit stores all newly detected
transponders, including the „successful“ parameters, in
the transponder list while performing a blind scan, provided the
transponders deliver data (not necessarily channels or services) –
after the scan is finished, you will see the new entries on the right
side of the Main Window. Please note that the same transponder
may be detected several times on close-by frequencies, depending on
the specified frequency step size and the catch range of your DVB
device. If you don't want an already populated transponder list to
get messed up with blind scan results, it is a good idea to use an
empty transponder list (see File/ New List...).
Finally an example how the blind scanner can be used for DVB-T. If you are living in France, TransEdit will probably find no channels at all with the standard „Europe“ transponder list, because all French DVB-T frequencies are shifted by 167 kHz. However, using the blind scanner with the following parameter ranges should do the trick:
Frequencies: 474.167-858.167:8
Bandwidths: 2
contents | to the top | preceding chapter | next chapter
During the DVBViewer installation a whole lot of INI files are written into the Transponders subdirectory of the DVBViewer configuration folder (see Info resp. Help Menu), much more than you will ever need. Most of them can be deleted. But probably you will find that the ones you really need (because they are necessary for scanning the satellites you are receiving), are not up-to-date. Sometimes the transponder occupancy changes from month to month. There are three things that you can do:
![]() Let TransEdit scan for new transponders. Use the Update Command in
the Scan Menu. Or tick "Scan NIT and Update Transponderlist"
in the Settings Window,
in order to let TransEdit search for new transponders during a
channel scan.
Let TransEdit scan for new transponders. Use the Update Command in
the Scan Menu. Or tick "Scan NIT and Update Transponderlist"
in the Settings Window,
in order to let TransEdit search for new transponders during a
channel scan.
However, the results will not be reliable on all satellite positions or with DVB-T, as already mentioned. It depends on the providers - whether they provide a good Network Information Table or not.
![]() Check the transponder occupancy of "your" satellite
positions in the web and edit the transponder list with TransEdit.
E. g. have a look at
Check the transponder occupancy of "your" satellite
positions in the web and edit the transponder list with TransEdit.
E. g. have a look at
![]() or download a new transponder list , e. g. from
or download a new transponder list , e. g. from
https://en.kingofsat.net/satellites.php
Please have in mind that some of the non-standard TransEdit entries are missing in these lists. If you open them with TransEdit, the transponder description, DiSEqC and the LOF values are set to their default.
Additionally TransEdit supports the import of DVB IPTV playlists (*.m3u files), that are available in the web for the VideoLAN Client (VLC). They are automatically converted to IPTV transponder lists. Drag and drop the playlist file into the TransEdit Main Window, or use „File/Open” and select „IPTV Playlists” as file type.
Transponder lists must be stored in the
Configuration Folder\Transponders sub-directory, if you want to make
them available in DVBViewer or let TransEdit load them automatically
when it is launched. If a transponder list file is located somewhere
else, you can load it by dragging and dropping it into the TransEdit
Main Window or by using „File/ Open”. Please use
„Save as” for storing the transponder list in the
Configuration Folder\Transponders sub-directory (which is
pre-selected as default directory).
contents | to the top | preceding chapter | next chapter