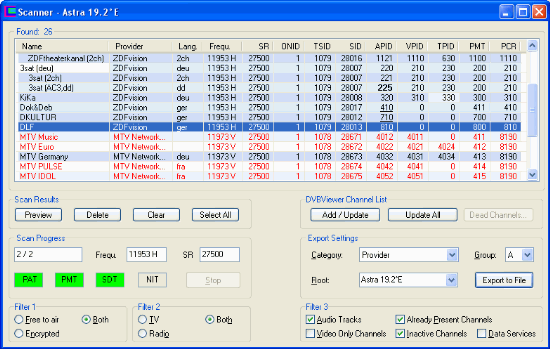
Clicking „Scan Selected“ or „Scan All“ in the Main Window opens the Scanner Window. It displays the scan results and provides export functions and filter options. Some more commands can be found in the context menu that appears after right-clicking the list.
Scanning and Scan Results | Sorting, Viewing and Filtering | Channel List Maintenance | Export Settings
While scanning is in progress, the Frequ. and SR Field in the Scan Progress Section display the frequency and symbol rate of the currently scanned transponder. The four color fields show whether receiving the data has been successful or not. Yellow signals "in progress" resp. „partial success”, green success and red failure. Dark background colors with white caption indicate the results of the previous (finished) frequency.
TransEdit reads three or (depending on the settings) four kinds of tables from the transponder's data stream:
![]() the Program Association Table (PAT) containing a list of all
services that are transmitted on the transponder. A red PAT field
indicates insufficient reception or no services present.
the Program Association Table (PAT) containing a list of all
services that are transmitted on the transponder. A red PAT field
indicates insufficient reception or no services present.
![]() the Program Map Table (PMT) containing the channel's PIDs.
Without these Packet Identifiers a digital receiver is not able to
figure out which audio-, video and teletext stream belongs to which
channel.
the Program Map Table (PMT) containing the channel's PIDs.
Without these Packet Identifiers a digital receiver is not able to
figure out which audio-, video and teletext stream belongs to which
channel.
![]() the Service Description Table (SDT) containing the channel-
and provider names (VCT, Virtual Channel Table for ATSC)
the Service Description Table (SDT) containing the channel-
and provider names (VCT, Virtual Channel Table for ATSC)
![]() the Network Information Table (NIT) containing a list of
active transponders in the DVB network. An additional NIT Scan may
be used to update a transponder list – see Scanner
Tab in the Settings Window, „Scan NIT and update
transponder list while scanning“
the Network Information Table (NIT) containing a list of
active transponders in the DVB network. An additional NIT Scan may
be used to update a transponder list – see Scanner
Tab in the Settings Window, „Scan NIT and update
transponder list while scanning“
The scanning process can be stopped by clicking the Stop Button.
In the list of scan results "Free to air" channels are displayed in black, pay TV channels in red - which doesn't necessarily mean that they are really encrypted. Sometimes they may be unencrypted, e.g. for promotion purpose, without switching the "encrypted" signal off. The actual state is shown by the TS Analyzer, that, in contrast to the scanner, examines the stream itself, not only the service information tables.
Additional audio tracks of a channel are indented, like „3sat (AC3,dd)“ in the image above.
Channels that are already present in the DVBViewer's channel list are displayed with light blue background, so that they can be distinguished easily from new channels. Individual attributes with white or gray background (like the name „3sat (deu)“ in the image above) differ from the DVBViewer's channel list. A different name doesn't matter, but if other more important data is concerned it is recommendable to update the channel: Select it an click the „Add / Update “ button (see below).
For recognizing a scan result in the
DVBViewer's channel list, the tuner type and the following
transponder parameters must match: Frequency (DVB-S/T/C, ATSC),
symbol rate (DVB-S/C), polarization (DVB-S) and the service ID, or
alternatively the video and audio PID plus the channel name.
Additionally TransEdit compares the orbital position for
distinguishing different satellite positions, provided it is
available in the DVBViewer channel list data.
Channel names in italic
indicate that a scan result has been recognized in the DVBViewer
channel list, but the assignment is uncertain, because the
orbital position is missing in the DVBViewer channel list data, thus
possibly entailing the danger of mismatches across satellite
positions resp. DVB networks. If assignments are apparently correct,
update the corresponding entries by using the „Add / Update“
or „Update All“ functions (see below). It will add
the missing data in the DVBViewer channel list and enable an
unambiguous assignment in future.
The list columns contain the following data:
![]() Name: The channel name. „Service XXXX“,
where XXXX ist the Service-ID, indicates that TransEdit is not able
to detect the name.
Name: The channel name. „Service XXXX“,
where XXXX ist the Service-ID, indicates that TransEdit is not able
to detect the name.
![]() Provider: The channel's provider. It can be used as category
when exporting the channel data. „Unknown“
indicates that TransEdit is not able to detect the provider.
Provider: The channel's provider. It can be used as category
when exporting the channel data. „Unknown“
indicates that TransEdit is not able to detect the provider.
![]() Language: The language assigned to the audio stream.
TransEdit additionally appends the language in parentheses to the
channel name, if it is necessary for distinguishing different audio
tracks of a channel.
Language: The language assigned to the audio stream.
TransEdit additionally appends the language in parentheses to the
channel name, if it is necessary for distinguishing different audio
tracks of a channel.
![]() Frequency: The channel's frequency in MHz, plus the
polarization (DVB-S only, H = horizontal, V = vertical). In case of
IPTV this column contains the IP address.
Frequency: The channel's frequency in MHz, plus the
polarization (DVB-S only, H = horizontal, V = vertical). In case of
IPTV this column contains the IP address.
![]() SR: Symbolrate (DVB-S/C only). In case of IPTV this column
contains the port number.
SR: Symbolrate (DVB-S/C only). In case of IPTV this column
contains the port number.
![]() ONID: The Original Network ID indicating from which network a
channel originates. Important for assigning EPG data to channels.
ONID: The Original Network ID indicating from which network a
channel originates. Important for assigning EPG data to channels.
![]() TSID: Transportstream ID: Also important for assigning EPG
data to the correct channel.
TSID: Transportstream ID: Also important for assigning EPG
data to the correct channel.
![]() SID: Service ID. DVBViewer needs it for auto channel update
and assigning EPG data to channels.
SID: Service ID. DVBViewer needs it for auto channel update
and assigning EPG data to channels.
![]() APID: Audio PID (Audio Data Packet Identifier). If zero, the
channel does not broadcast audio. Boldface audio PIDs indicate AC3
or AAC audio (in contrast to MPEG audio), underlined PIDs the
presence of radiotext data (RDS) in the audio stream.
APID: Audio PID (Audio Data Packet Identifier). If zero, the
channel does not broadcast audio. Boldface audio PIDs indicate AC3
or AAC audio (in contrast to MPEG audio), underlined PIDs the
presence of radiotext data (RDS) in the audio stream.
![]() VPID: Video PID (Video Data Packet Identifier).If zero, it is
a radio station. Boldface video PIDs indicate H.264 video.
VPID: Video PID (Video Data Packet Identifier).If zero, it is
a radio station. Boldface video PIDs indicate H.264 video.
![]() TPID: Teletext PID (Teletext Data Packet Identifier). If
zero, no teletext is available.
TPID: Teletext PID (Teletext Data Packet Identifier). If
zero, no teletext is available.
![]() PMT: Program Map Table Packet Identifier. The PMT lists all
streams that belong to a channel (audio, video, teletext,
subtitles...) Important for TS recording.
PMT: Program Map Table Packet Identifier. The PMT lists all
streams that belong to a channel (audio, video, teletext,
subtitles...) Important for TS recording.
![]() PCR: Program Clock Reference Packet Identifier. The PCR
contains important time data. Mostly it is included in the video or
audio stream, so that the PCR PID and the Video or Audio PID are
identical. Some providers prefer to broadcast a separate PCR stream,
however. In this case a missing or wrong PCR PID disables MPG
recording.
PCR: Program Clock Reference Packet Identifier. The PCR
contains important time data. Mostly it is included in the video or
audio stream, so that the PCR PID and the Video or Audio PID are
identical. Some providers prefer to broadcast a separate PCR stream,
however. In this case a missing or wrong PCR PID disables MPG
recording.
contents | to the top | preceding chapter | next chapter
 After
scanning is finished, you may arrange or limit the scan results in
different ways and pre-view them if you want to see and hear what is
broadcasted. The commands are available as buttons on the left side
of the Scanner Window and in the context menu that appears after
right-clicking the list.
After
scanning is finished, you may arrange or limit the scan results in
different ways and pre-view them if you want to see and hear what is
broadcasted. The commands are available as buttons on the left side
of the Scanner Window and in the context menu that appears after
right-clicking the list.
![]() Sorting: Click the column header if you want to sort the list
according to channel attributes like channel name, service ID or
whatever. Clicking a column header again reverses the sort order. A
marker indicates by
which column and in which direction (ascending / descending) the
list is sorted. You may also change the column
width by dragging the line at the border between the column
titles with the mouse, or even hide columns in this way (which is
not recommendable if you want to see all discrepancies between the
DVBViewer's channel list and the scan results).
Sorting: Click the column header if you want to sort the list
according to channel attributes like channel name, service ID or
whatever. Clicking a column header again reverses the sort order. A
marker indicates by
which column and in which direction (ascending / descending) the
list is sorted. You may also change the column
width by dragging the line at the border between the column
titles with the mouse, or even hide columns in this way (which is
not recommendable if you want to see all discrepancies between the
DVBViewer's channel list and the scan results).
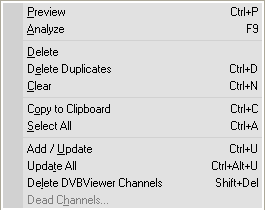
![]() Preview: Opens the Preview Window and plays the selected TV
channel resp. lets you listen to the radio station. Alternatively
you may double-click an entry in the list of scan results. The
Preview volume can be controlled with the mouse wheel.
Right-clicking the window opens a context menu with the following
content:
Preview: Opens the Preview Window and plays the selected TV
channel resp. lets you listen to the radio station. Alternatively
you may double-click an entry in the list of scan results. The
Preview volume can be controlled with the mouse wheel.
Right-clicking the window opens a context menu with the following
content:
Full Screen or the [F] key switch the Preview Window to full screen mode and back. Double-clicking the window has the same effect. In full screen mode TransEdit prevents screen savers and energy-saving monitor-off options from stopping the show.
The Aspect Ratio sub-menu allows to select the aspect ratio. The Preview Window always opens with active „Auto”setting. In most cases it will select the correct aspect ratio, but you can also select 4:3 or 16:9 manually. „None” lets TransEdit adjust TV picture to the current window size.
The Filters sub-menu lists all DirectShow components that are used for playback. If a filter provides a property page, it can be opened by clicking the corresponding menu item. Otherwise it is disabled. The DVBViewer Filter's property page, that informs about the current video and audio format, can also be opened directly by using the keyboard shortcut [D].

It is recommendable to select a suitable
video and audio decoder on the Preview
Tab of the Settings Window before using the Preview Function for
the first time. The default setting „Auto“ lets
DirectShow select the decoders – sometimes, depending on the
system configuration, with questionable results.
![]() Analyze: Opens the Analyzer
Window that lists all streams broadcasted on the frequency of
the selected entry, plus the complete content of the SI (Service
Information) tables as treeview.
Analyze: Opens the Analyzer
Window that lists all streams broadcasted on the frequency of
the selected entry, plus the complete content of the SI (Service
Information) tables as treeview.
![]() Delete: Deletes the selected scan results from the list (not
from the DVBViewer's channel list), thus excluding them from being
added to the DVBViewer channel list or exported to a file. Useful if
you want to add, update or export all scan results except a few
unwanted channels: Delete them, click „Select All“
and „Add / Update“ or „Export to File“.
Delete: Deletes the selected scan results from the list (not
from the DVBViewer's channel list), thus excluding them from being
added to the DVBViewer channel list or exported to a file. Useful if
you want to add, update or export all scan results except a few
unwanted channels: Delete them, click „Select All“
and „Add / Update“ or „Export to File“.
![]() Delete Duplicates (context menu): Makes sure that scan
results only appear once in the list. Useful if you have scanned a
transponder twice.
Delete Duplicates (context menu): Makes sure that scan
results only appear once in the list. Useful if you have scanned a
transponder twice.
![]() Clear: Clears the list of scan results by deleting all
entries.
Clear: Clears the list of scan results by deleting all
entries.
![]() Select All: Selects all scan results in the list.
Select All: Selects all scan results in the list.
The lower part of the Scanner Window provides various filter options allowing to limit the displayed (resp. added, updated, exported...) scan results to a certain selection. The filter options do not delete scan results. Internally they remain stored, so that you can change or undo a selection at any time.

![]() Filter 1:
Filter 1:
Free to air: Only unencrypted channels are shown in the list.
Encrypted: Only encrypted channels are shown in the list..
Both: Both types are displayed.
![]() Filter 2:
Filter 2:
TV: Only TV channels are shown in the list.
Radio: Only radio stations are shown in the list.
Both: Both types are displayed.

![]() Filter 3:
Filter 3:
Audio Tracks: Unticking this checkbox lets TransEdit hide additional audio tracks of channels and only display the base entries.
Already Present Channels: Shows / hides scan results that are already present in the DVBViewer's channel list, thus making it easier to find new channels.
Video Only Channels: Shows / hides TV channels without audio (e.g. data channels with a promo picture).
Inactive Channels: Shows / hides scan results that are flagged as video/audio service in the Service Description Table (SDT), but are currently broadcasting no video and no audio stream.
Data Services: Shows / hides data channels, that provide no video or audio stream and are not flagged as video/audio service in the SDT.
contents | to the top | preceding chapter | next chapter
Nowadays channel lists tend to become huge data collections, particularly if your equipment enables receiving several satellite positions, and it can be quite cumbersome to keep such a list up-to-date and well sorted. The TransEdit Scanner Window provides some facilities for DVBViewer channel list maintenance. The commands are available as buttons on the right side of the Scanner Window and in the context menu that appears after right-clicking the list of scan results.
If you want to use the following commands
don't edit the channel list in DVBViewer while TransEdit Scanner
Windows are open! If DVBViewer is running simultaneously TransEdit
prompts it to save its channel list (by sending a message) as soon as
the first Scanner Window is opened, loads the channel list in its own
memory space and keeps it there until all Scanner Windows are closed.
The Add / Update / Delete commands described below will let DVBViewer
reload the channel list file (channels.dat). All channel list changes
that have been made in DVBViewer in the meantime will be lost in this
case.
![]() Add / Update: Applies to the selected entries. Scan
results that are not yet present in the DVBViewer channel list (gray
or white background) are added. In case of scan results that are
already present (light blue background, also partially) the
corresponding entries in the DVBViewer channel list are updated.
Add / Update: Applies to the selected entries. Scan
results that are not yet present in the DVBViewer channel list (gray
or white background) are added. In case of scan results that are
already present (light blue background, also partially) the
corresponding entries in the DVBViewer channel list are updated.
![]() Update All: Applies to all scan results in the list
that are already present in the DVBViewer channel list (light blue
background, also partially). The corresponding entries in the
DVBViewer channel list are updated.
Update All: Applies to all scan results in the list
that are already present in the DVBViewer channel list (light blue
background, also partially). The corresponding entries in the
DVBViewer channel list are updated.
How channels are added to the DVBViewer channel list depends on the export settings (see below). However, new audio tracks are inserted independently from the export settings as sub-items of the according channel, provided it is already present. When updating channels, TransEdit does not change user-defined settings (root, category, DiSEqC, channel group etc.). Whether channel names are updated or not depends on the corresponding checkbox on the Scanner Tab of the Settings Window. Untick it if you prefer your own naming system.
![]() Copy to Clipboard (context menu): Copies the selected scan
results to a temporary file. This method of transferring channels
will be supported by future DVBViewer versions (at least DVBViewer
GE).
Copy to Clipboard (context menu): Copies the selected scan
results to a temporary file. This method of transferring channels
will be supported by future DVBViewer versions (at least DVBViewer
GE).
![]() Delete DVBViewer channels (context menu): Applies to all
selected scan results that are already present in the
DVBViewer channel list (light blue background, also partially).
Deletes the corresponding entries from the DVBViewer channel list
after prompting for confirmation.
Delete DVBViewer channels (context menu): Applies to all
selected scan results that are already present in the
DVBViewer channel list (light blue background, also partially).
Deletes the corresponding entries from the DVBViewer channel list
after prompting for confirmation.
![]() Dead Channels: Displays a list of channels from the
DVBViewer's channel list that are expected to exist on a scanned
transponder (according to the channel list data), but cannot be
found there, thus probably being „dead“. The list allows
to selectively remove these channels from the channel list. The
command is only available if TransEdit has detected such entries
while scanning.
Dead Channels: Displays a list of channels from the
DVBViewer's channel list that are expected to exist on a scanned
transponder (according to the channel list data), but cannot be
found there, thus probably being „dead“. The list allows
to selectively remove these channels from the channel list. The
command is only available if TransEdit has detected such entries
while scanning.
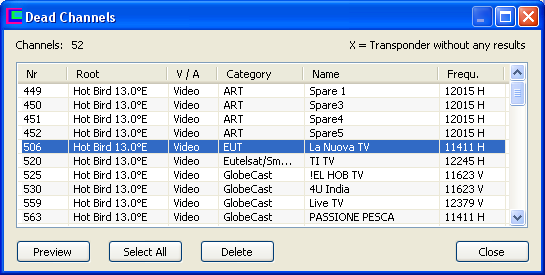
You can do the following in the Dead Channels Window:
Preview (or double-clicking a list item) plays the selected channel in the Preview Window (see above), allowing you to check whether a channel classified as dead channel is really „dead“ or not.
Select the entries that you want to remove from the DVBViewer's channel list. For multi-selection hold the Ctrl or Shift key down while clicking.
Select All selects the whole content of the list.
Delete removes the selected items from the DVBViewer channel list after prompting for confirmation.
Close closes the window, updates the channel list file and lets DVBViewer reload it, if it is running.
Please regard the displayed dead
channels as suggestion, not as fact. Maybe they are only
temporarily missing, because they are not receivable due to bad
weather conditions or other reasons. In case of doubt use the Preview
function to assure that a channel is really „off air“. An
X mark in the frequency column indicates that this frequency
delivered no scan results at all. Either important reception
parameters (e. g. the symbol rate) have changed and must be updated
in the transponder list, or the transponder has been switched off, or
reception is disturbed for some reason (maybe only temporarily).
contents | to the top | preceding chapter | next chapter
The Export Settings are used by TransEdit when adding channels to the DVBViewer channel list or saving them in a file.
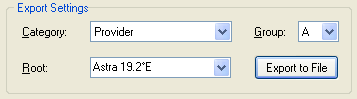
 The
Category Drop-down List determines under which category
exported channels appear in the DVBViewer channel list:
The
Category Drop-down List determines under which category
exported channels appear in the DVBViewer channel list:
![]() Provider: All channels with the same provider will be placed
in the same category.
Provider: All channels with the same provider will be placed
in the same category.
![]() Frequency: Selects the frequency as category, or in other
words, the transponder. TransEdit uses the content of the frequency
column as category name.
Frequency: Selects the frequency as category, or in other
words, the transponder. TransEdit uses the content of the frequency
column as category name.
![]() Scan Date: Puts all exported channels in a single category
with the current date as category name.
Scan Date: Puts all exported channels in a single category
with the current date as category name.
![]() Initial Letter: TransEdit uses the initial letters of the
scan results as category names. All channels with the same initial
will be placed in the same category.
Initial Letter: TransEdit uses the initial letters of the
scan results as category names. All channels with the same initial
will be placed in the same category.
It is recommendable to sort the list
according to the type of categorization before exporting it. Click
the Provider, Frequency or Name column title in order to get a sorted
sequence of categories in the DVBViewer channel list.
The Root Drop-down List specifies under which root folder (usually representing a DVB network) exported channels appear in the DVBViewer channel list:. The default setting is the name of the transponder list that has been used for scanning, but you may also
![]() pick a root folder that is already existing in the DVBViewer channel
list from the drop-down list. The list only offers root folders
containing channels with a matching tuner type and (in case of
satellite channels) matching orbital position.
pick a root folder that is already existing in the DVBViewer channel
list from the drop-down list. The list only offers root folders
containing channels with a matching tuner type and (in case of
satellite channels) matching orbital position.
![]() enter a new name, since the list can also be used as input field.
enter a new name, since the list can also be used as input field.
When loading exported/added channels,
DVBViewer will create the root folder, if it doesn't exist yet. If
the root folder already exists, it depends on the category where a
new channel is inserted. If the category does not exist yet, it will
be created. If the category already exists, the new channel will be
appended to it.
It is strongly recommended not to mix
channels with a different tuner type (DVB-S/T/C) or from different
satellite positions within a root folder, in order to keep the
channel list clearly arranged and the handling easy. DVBViewer GE
already enforces different root folders for channels with different
DVB network properties by automatically renaming root folders, if
necessary, and DVBViewer Pro will probably handle it similarly in
future.
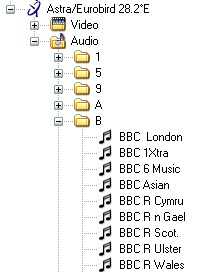
The Group Drop-down List assigns one of the channel groups A...H to exported/added channels. Default is group A, except if another channel group has been assigned in the Main Window to the transponder list that is used for scanning.
Channel Groups enable binding channels to
specific devices in DVBViewer and TransEdit (see Hardware
Tab of the Setting Window). It will only be relevant in special
cases, however. Normally it does not matter to which group a channel
belongs, since by default all groups are permitted for all devices.
But imagine the following: There are two DVB-S devices, each of them
connected to a separate dish - one for receiving Astra and the other
one for Hotbird. Without telling DVBViewer and TransEdit which device
must be used for which channels, they will use both indiscriminately
for all DVB-S channels. This is one of the problems that can be
solved by using channel groups.
The Export to File Button opens a file dialog window allowing to save the data of the selected scan results to a file. Click „Select All“ if you want to export all scan results. The following export formats are available:
![]() INI: A DVBViewer text format that can be imported in the
channel list. It is particularly suitable for channel list exchange.
You may attach INI channel list files in the DVBViewer Forum if you
want to make them available for all users.
INI: A DVBViewer text format that can be imported in the
channel list. It is particularly suitable for channel list exchange.
You may attach INI channel list files in the DVBViewer Forum if you
want to make them available for all users.
![]() CSV: A text format that can be read by database applications
and spread sheets (e. g. Excel), and be imported in the DVBViewer's
channel list window by using an appropriate import plugin (included
in DVBViewer GE).
CSV: A text format that can be read by database applications
and spread sheets (e. g. Excel), and be imported in the DVBViewer's
channel list window by using an appropriate import plugin (included
in DVBViewer GE).
Scan results exported as INI file can be
opened and re-imported in
TransEdit. They are displayed in a Scanner Window „as if
scanned” and can be reworked by sorting or filtering them in a
different way. All
functions of the Scanner Window are available except "Dead
Channels" and
"Analyze".
TransEdit writes an additional field named „Provider”
(which is ignored by DVBViewer) to the INI files enabling to restore
the original Provider Column. If this field is missing (e.g. in
DVBViewer exports), TransEdit replaces the Provider Column by a
Category Column containing the category from the DVBViewer channel
list.
contents | to the top | preceding chapter | next chapter