The view menu offers different functions to influence the appearance of the DVBViewer-window:
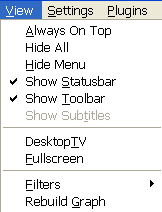 Always on top: Enabled, the DVBViewer window will stay on top of other windows.
All these features are also available in the fullscreen mode via the context menu.
contents | to the top | to the bottom | previous chapter | next chapter
You can choose between two different modes of displaying the TV picture:
Fullscreen: This option switches between window mode and fullscreen mode (the entire display will be used).
You may also (de-)activate fullscreen mode by double-clicking on the display area. In fullscreen mode there are no visual controls by default, but you may enable them via context menu, or simply use the OSD (on screen display) controls.
Desktop TV: This is a speciality of the DVBViewer. Selected, the DVBViewer will display the current TV picture as desktop background!
Reminder: You can't access the context menu by right-clicking while being in desktop mode. You need to right-click the tray icon.
contents | to the top | to the bottom | previous chapter | next chapter
 The DVBViewer also offers extensive OSD functionality. To adjust the OSD settings go to the control tab of the DVBViewer options. There you can assign a lot of DVBViewer functions to various keyboard shortcuts. The OSD functions can be found at the bottom of this function list.
In order to assign a new key to a function, double-click it and then press the desired key or combination of keys. On the WinLIRC sub-tabsheet you may adjust the remote control settings accordingly. Finish with OK, after you've made all necessary adjustments.
The OSD functions work like this:
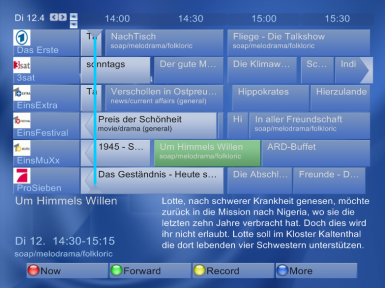
OSD open/select: This activates the OSD or selects the function marked with the red bar. Most of the basic functions, which can be seen on the right, open another level with further options.
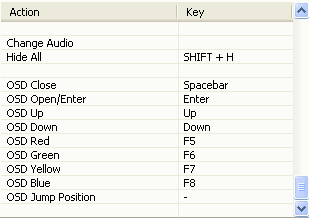 OSD Close/Back: Closes the OSD at the highest level or goes back to the previous level.
OSD up/OSD down: Moves the selector (red bar) in the appropriate direction. Alternatively you may move the selector with the numerical keys 0..9 to one of the first ten visible entries.
OSD red/green/yellow/blue: Activates the function displayed in the corresponding colour at the bottom.
OSD jump position: Activates a track-bar for seeking (jumping) in media-files or timeshift recordings.
You may also select different styles for the OSD (covering, semi-transparent, transparent) at Settings/Options/Teletext & EPG. The VMR (video mixing renderer) provides a real transparent OSD display. Read more in this paragraph in chapter 7.
contents | to the top | to the bottom | previous chapter | next chapter
The aspect ratio can be modified via the settings- or context menu. In a sub-menu you may select one of the following aspect ratios:
4:3, 14:9, 16:9 (widescreen) and 2.35:1 (cinemascope): These options will override the original ratio of the broadcast. You should use this when the automatical selection fails to display the picture correctly. It may be also necessary for the playback of cropped videos or AVI files.
Auto: The DVBViewer automatically sets the aspect ratio according to the data transmitted with the TV picture. This is the default setting, which will give good results with most broadcasts.
None: The DVBViewer does not adjust the TV picture. Instead it will fit the DVBViewer display-window, probably resulting in wrong proportions.
contents | to the top | to the bottom | previous chapter | next chapter
 The zoom command in the settings menu lets you adjust the position and size of the TV picture with four sliders.
You can move and stretch the TV picture both horizontally and vertically to completely fill the window and eventually remove black bars.
The five radio buttons down left enable fast switching to different window sizes ranging from mini television to display-filling size, whereby the aspect ratio is preserved. The context menu offers the same functionality with the zoom command.
The Default button resets all adjustments to the standard setting.
You can pre-set 3 settings with the "recall"-button.
Of course you may also resize the DVBViewer window by left-clicking its lower right corner and dragging it to the desired size. In this way and in combination with the "none" aspect ratio setting the picture can be adjusted to any desired proportions.
contents | to the top | to the bottom | previous chapter | next chapter
The filters option lists the active DirectShow components. Selecting one of them opens its property page window. Usually it is not necessary to apply any changes there, and you should only try to adjust these settings if you know what you are doing. This doesn't work with the NVIDIA decoder, there you have to use its tray icon.
The command rebuild graph resets all DirectShow filters and starts them again. In this way possible problems with distorted audio or video can be solved. Such problems can occur when using the fast channel switching (see Settings/Enhanced Options). This may happen with certain audio decoders, when switching to another channel with a lower audio bit-rate (e.g. from stereo to mono), resulting in a sound, that is periodically interrupted and played to fast (sounds like Mickey Mouse voices).
Rebuilding the graph is also needed for certain changes you have applied in the options window to take effect (for example selecting another video decoder in combination with Marfi's or the DVBViewer source filter).
Additional information about DirectShow filters can be found in chapter 10.