This section describes fundamental operations, accessible via the toolbar above the TV screen. The icons provide a tooltip, when positioning the mouse pointer on it for 1 or 2 seconds.
![]()
Additional functions can be accessed via the main menu and the context menu. You may also assign functions to any key, have a look at chapter 7.
contents | to the bottom | previous chapter | next chapter
![]()
This symbol turns the status bar on and off. The bar informs you about
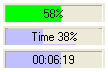 Left-clicking the signal strength field switches to a progress bar, indicating the actual play time in percent and. The next click shows the remaining play time. Correct values are only displayed in case EPG data is available for the transmission.
contents | to the top | to the bottom | previous chapter | next chapter
This icon switches to fullscreen mode. You can do the same by double-clicking the television picture. Double-clicking it again, you revert to window mode. In fullscreen mode a control bar pops up when moving the mouse-pointer to the bottom of the screen.
![]() This symbol enables/disables all controls - the title bar as well as the menu -, tool- and status bar. Only a thin frame bordering the television picture remains.
This symbol enables/disables all controls - the title bar as well as the menu -, tool- and status bar. Only a thin frame bordering the television picture remains.
Yyou can enable/disable all controls by the View -> Hide All item in the context menu. Alternatively you can use the control bar when moving the mouse-pointer to the bottom.
contents | to the top | to the bottom | previous chapter | next chapter
Clicking this symbol opens the channel list, which shows all selectable stations sorted in categories. The multiple possibilities are described in detail in chapter 6. Here are only the most important operations: Double-clicking a category unfolds the list of channels sorted into it, double-clicking a station switches over to it.
The two symbols ![]()
![]() switch to the following respectively the previous station. As for the other controls, you can also assign keyboard shortcuts to these functions.
switch to the following respectively the previous station. As for the other controls, you can also assign keyboard shortcuts to these functions.
Useful at this point is also the last channel feature in the channel menu, which shifts back to the previous station or media-file.
The option Show EPG Info in the DVBViewer-menu displays a short info about the current channel, its name, the current time-of-day and additionally - provided the information is available - the current and following broadcast with their starting times. The same menu option switches the EPG Info off. In Settings/Options/Teletext & EPG you may select different styles and display types (opacity/transparency) for the OSD (On Screen Display).

After left-clicking a broadcast displayed in the EPG Info, additional information appear, e.g. a summary of the event. Another click into the info reverts to the standard display.
After switching over to a station, the EPG information automatically appear for a few seconds.
A highly interesting feature is the Preview function via the Preview Plugin. Starting Preview a new window opens. Now use the context-menu by right-clicking into it. All stations broadcasting on the same transponder are listed. Now you can select a channel. You can also set the render mode and the decoder besides some other options.
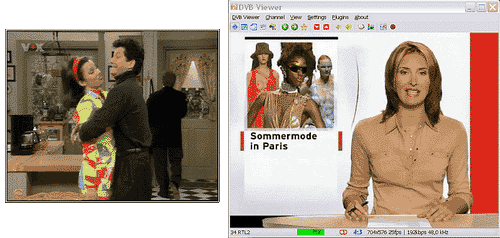
The preview window can be easily resized by dragging a corner with the mouse. If no channel can be tuned in the preview window, a second video decoder is probably necessary, because some video-decoders can run only in one instance. To solve this issue you may download and install the Elecard® MPEG2-decoder pack.
contents | to the top | to the bottom | previous chapter | next chapter
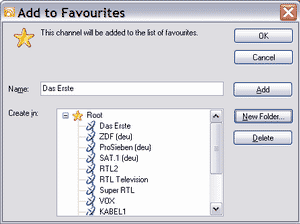
The channel menu offers a list of popular stations for comfortable selection. By clicking the asterisk symbol you can access the favourites editor.
The symbols ![]()
![]() switch over to the preceding or following station in the favourites list. By using the keyboard, the favourite channels can be selected with [shift key] + [digit key] (if you did not assign other keys to this function).
switch over to the preceding or following station in the favourites list. By using the keyboard, the favourite channels can be selected with [shift key] + [digit key] (if you did not assign other keys to this function).
contents | to the top | to the bottom | previous chapter | next chapter
The two loudspeaker symbols serve as volume control:
In both cases the volume level is briefly displayed in the DVBViewer window. For switching the sound off or on, you may use the Mute Function in the context menu (right-click the DVBViewer window). By the way: The DVBViewer uses a logarithmic based volume control.
Clicking this symbol starts the recording of the current broadcast. A second click stops the recording.
The folder for recorded files can be selected in the options window on the tabsheet Recorder. By default the subfolder Capture of the DVBViewer folder is used. On the same tabsheet the file format for videos can be selected. The default setting is MPEG2-PS.
The DVBViewer automatically creates unique names for recorded files. They consist of the starting date and time, the channel name and the title of the broadcast (if provided by the EPG).
Additional information about recording and the Time Shift function can be found in chapter 5 and the following section.
contents | to the top | to the bottom | previous chapter | next chapter
This symbol opens the recorder control window. It provides additional information and some special options for recording:
contents | to the top | to the bottom | previous chapter | next chapter
This symbol opens a window with four sliding controls for brightness, saturation, contrast and the hue of the television picture. These settings are also available via the context menu.
Please note that this window cannot be used in certain render modes. It will only work with the overlay mixer or VMR® 9 (video mixing renderer).
contents | to the top | to the bottom | previous chapter | next chapter
This symbol opens the Teletext window. It provides the following possibilities:
Additionally the DVBViewer provides the possibility to insert Teletext subtitles in the television picture. Select Show Subtitles in the view menu, and enter the number of the desired subtitle teletext page. The subtitles are faded out after selecting Show Subtitles again. You can move the subtitles with drag'n'drop.
To use the search-function click the binoculars to open an input field. The search-term will be highlighted in the text.
Please keep in mind that some stations do not provide teletext. In this case the teletext symbol is disabled – this is also the case, if no Teletext Pid has been entered in the channel list. Sometimes it can take a while until a page is transmitted. After having been stored in the page memory the pages are accessible without delay.
contents | to the top | to the bottom | previous chapter | next chapter
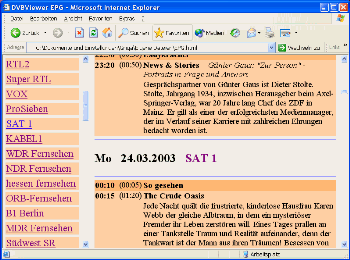
This symbol opens the so called electronic program guide (EPG). At the beginning it shows a list of the broadcasts of the current station. The current broadcast is highlighted.
Basically there are three EPG modes: A station-specific list (as shown above), as well as a time-specific list (full version only), which shows the broadcasts of different stations running at a certain point in time. Switching between these two modes is done by clicking the button "Whats now...". First the possibilities, which both modes are offering:
 Left clicking a title the entry is marked and more detailed information about this event are shown in the bottom part of the window (if available).
 If the station-specific list is active, there are the following additional options:
After switching to the time-specific list there are the following possibilities:
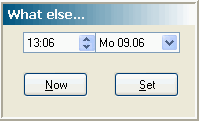 Right-click the list to open a menu, which offers several options for putting the point in time on or back. The Another Time... option opens a window that allows to enter a specific time or date. This also can be achieved by clicking the column title Time.
Event and title show the title of the selected item.
There is also a graphical timeline mode:
Please note that some stations do not transmit EPG data. Also the range and the amount of the data may differ. Only broadcast information can be displayed. The EPG information are read out while a TV/radio station is tuned. After switching to another channel the data is kept in memory.
If you want the EPG data to be automatically stored on your hard disk when terminating the DVBViewer and reloaded when re-launching it, make sure that the Persistent EPG Data option is checked in Settings/Options/Teletext & EPG.
contents | to the top | to the bottom | previous chapter | next chapter
The full version of the DVBViewer features a plugin interface. With the Plugin SDK, downloadable via the Service Center (for registered customers only), you can create your own plugins. All plugins have to be put into the Plugins folder.
Currently there are the following plugins:
This plugin lets you comfortably choose different filter-graphs for use with the source-filters (read more about filters in chapter 11.
The VRP offers real transport stream recording and other different settings for the DVBViewer.
With this plugin you can record directly in the MP3, Ogg Vorbis or Wave format. This is especially useful when recording radio broadcasts. Audio-recording can run simultaneously with normal recording of the DVBViewer. You will find a detailed description here.
This plugin enables UDP multicast network streaming with all source-filters.
With this one you can comfortably program the recorder timer with the program guide TVgenial. You will find further details in chapter 11.
The Info option in the help menu opens a window, which informs about the program version. The tabsheet Credits lists all helpers, who contributed to the DVBViewer, by testing, providing language files etc; maybe you will be one of them soon?
When connected to the Internet, the tabsheet news informs about DVBViewer updates. No information is being sent to the DVBViewer- or any other site.